Would you like to be notified when a mobile worker completes an inspection? How about an automatic report that’s generated after new data is collected or updated in the field? You can automate both of these tasks with the help of webhooks.
In this article we’ll introduce key concepts and then guide you through the ins and outs of configuring a webhook that works with ArcGIS Field Maps and Microsoft Power Automate to improve and automate key workflows.
This is a very technical procedure and is recommended for intermediate to advanced users. If you are interested in using webhooks with Integromat, see this blog post to get started. If you have specific requirements related to webhooks, we’d love to hear about it. Please email us at arcgisfieldmaps@arcgis.com.
Note: This article only applies for ArcGIS Online. Feature service webhooks are currently not available in ArcGIS Enterprise.
What is a webhook?
If you’ve used services like Slack or GitHub you may be familiar with webhooks. A webhook is a way for an application to provide other apps with near real-time information via callbacks. This functionality enables automated workflows, such as sending an email notification when an inspection is completed. Webhooks are user-defined HTTP requests that are trigged by an event. When that event occurs, the configured app or service sends an HTTP POST request to the configured webhook URL. In the case of ArcGIS Online hosted feature services, such events include when features are created, updated, or deleted (among other things). For more information about ArcGIS Feature Service Webhooks, check out this blog post.
There are a few key concepts to understand regarding webhooks:
- Trigger – starts the webhook task/process
- Action – something the webhook does
- Provider – third party software that enables webhooks
- Payload – content sent to the webhook
When a webhook is triggered, a payload of information is sent to the specified URL. Then the provider that maintains that URL can take an action with the provided information. There are many providers such as: Integromat, Microsoft Power Automate, and Zapier that can be configured to consume webhooks.
What is an automation workflow?
Workflow automation is technology that uses a set of defined rules to automate a manual process. It is common to develop an automation workflow for tasks that are well defined, complex, and repeatable. A few examples of automation workflows in the context of ArcGIS Online are:
- Sending an email notification when a new feature is collected
- Updating the information in a third-party system (e.g., Google Sheets, SAP) when a feature is edited
- Creating or updating features when another feature was modified
In this tutorial, we are going to automate a workflow using Microsoft Power Automate – software that supports incoming webhooks and other actions to support automating tasks without code. We’ll focus on creating a webhook workflow that emails a supervisor when a damage assessment report has been completed.
Let’s get started!
Note: This tutorial relies on some Premium Power Automate connectors which may not be available with all licenses.
Create a feature service and map
In ArcGIS Online, navigate to the content page and create a new layer using the Damage Assessment feature layer template.

Select only the Residential Buildings layers. When prompted, provide a name for your new feature service and continue through the dialogs until it’s successfully created. Once the layer has been created, open the Settings tab and scroll to the Editing settings. Check the Keep track of created and updated features and click Save. This will enable change tracking for the feature service which is a prerequisite for enabling webhooks.
Next, let’s add this new layer and table to a new map. On the Overview tab, click the overflow button near Open in Map Viewer . In Map Viewer, save the map. Later, we will use this map in ArcGIS Field Maps to collect features.
Creating the flow with Power Automate
Now we are going to use Power Automate and create a new flow that can consume the webhook we will enable. At a high-level these are the steps that we need to do:
- Configure an incoming webhook for Power Automate
- Configure an outgoing webhook for the feature service
- Create a complete flow to process the new damage assessment features
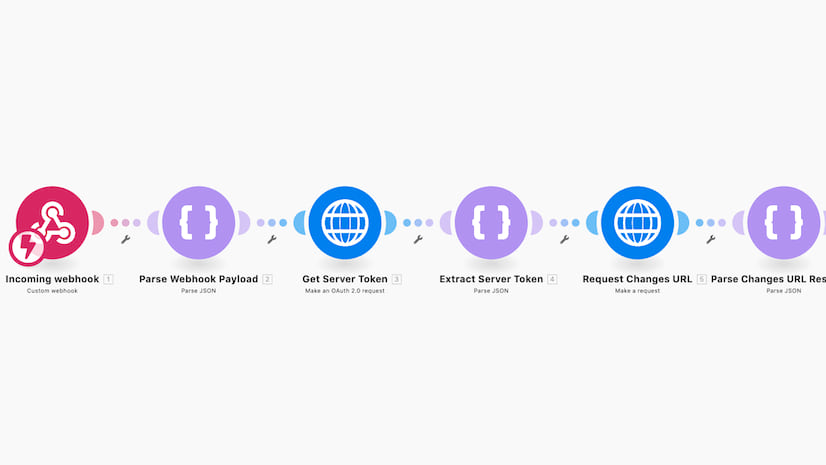
At the end of the tutorial, the flow should look like this:

In Power Automate (after signing in), click My flows. Then, click New flow and select Instant cloud flow.

Enter a name for your flow (e.g. Email when assessment completed). Select the When an HTTP request is received trigger (it’s near the bottom of the list). Then click Create.
At least one action must be added before the flow can be saved. Click + New step to add a new step to the flow. Search for the HTTP action and click it. This first action is going to use ArcGIS Online credentials (for a built-in user) to generate a token which will be used in future actions. Configure it as follows using your own credentials:
- Method:
POST - URI:
https://arcgis.com/sharing/rest/generateToken - Headers:
- Key:
Content-Type - Value:
application/x-www-form-urlencoded
- Key:
- Body:
username={username}&password={password}&referer=https://arcgis.com&expiration=60&f=json

Rename the action to “Generate Portal Token” – this will make it easier to understand the steps that make up the flow.
Note: As a best practice, these credentials should be stored in Azure Key Vault and fetched as needed. To simplify the tutorial, these steps were omitted. Also, consider using Secure inputs and outputs to hide your credentials in flow results.
Click Save to save the flow.
Click the When a HTTP request is received trigger to configure it. Set the Request Body JSON Schema to:
This will allow the future actions to use the properties of the webhook payload to make additional requests. Once the flow is completed, we will come back to this trigger and use the generated URL to configure the webhook in ArcGIS Online.
Click + New step and add a Parse JSON action. Rename the action to “Portal Token Response”. This step will parse the response from the server and extract the token.
Set the Content to be the “Body” of the previous “Generate Portal Token” action: @{body('Generate_Portal_Token')}
Set the Schema to:

Next, the portal token needs to be exchanged for a server token. The serverURL will be derived from the initial webhook payload using the changesUrl property. Click + New step and select the HTTP action. Rename it to “Generate Server Token”. Configure it as follows:
- Method:
POST - URI:
https://arcgis.com/sharing/rest/generateToken - Headers:
- Key:
Content-Type - Value:
application/x-www-form-urlencoded
- Key:
- Body:
f=json&token=@{body('Portal_Token_Response')?['token']}&serverURL=@{decodeUriComponent(first(triggerBody())['changesUrl'])}

Click + New step and add a Parse JSON action. Rename the action to “Server Token Response”. This step will parse the response from the server and extract the token.
Set the Content to be the “Body” of the previous “Generate Server Token” action: @{body('Generate_Server_Token')}
Set the Schema to:

Next, the changesUrl provided by the webhook payload will be fetched.
Click + New step and select the HTTP action. Rename the action to “Get Changes”. This will trigger an asynchronous job that will generate the changeset.
Configure it as follows so that an authenticated request is made to the changesUrl:
- Method:
GET - URI:
@concat(decodeUriComponent(first(triggerBody())['changesUrl']),'&f=json') - Headers:
- Key:
X-Esri-Authorization - Value:
Bearer @{body('Server_Token_Response')?['token']}
- Key:

Next, the results from this job need to be parsed so that the job status can be checked periodically until the results are ready.
Click + New step and select the Parse JSON action. Rename the action to “Changes Response”
Set the Content to the body of the “Get Changes” action: @{body('Get_Changes')}
Set the Schema to:

Next, the status of the job will be checked every 5 seconds. A loop needs to be introduced to the flow to accomplish this. Click + New step and select the Do until action. Rename the action to “Check Status Results Until Ready”.
Inside the loop, click Add an action. Select the Delay action.
Set the Count to 5.
Set the Unit to Second.

Click Add an action and select the HTTP action. Rename the action to “Check Status”.
Configure it as follows so that an authenticated request is made to the statusURL:
- Method:
GET - URI:
@{body('Changes_Response')?['statusUrl']} - Headers:
- Key:
X-Esri-Authorization - Value:
Bearer @{body('Server_Token_Response')?['token']}
- Key:
- Queries:
- Key:
f - Value:
json
- Key:

Click Add an Action and select the Parse JSON action. Rename the action to “Parse Status”.
Set the Content to the Body of the “Check Status” action: @{body('Check_Status')}
Set the schema to:

Back in the “Check Status Results Until Ready” action, set the value to “status” of the request: @{body('Parse_Status')?['status']}
Set the operator to “is equal to” and set the other value to “Completed”.

Once this loop exists, the results should be ready to download.
Click + New step to add a new HTTP action. Rename the action to “Get Edits”.
Configure it as follows so that an authenticated request is made to the resultUrl:
- Method:
GET - URI:
@{body('Parse_Status')?['resultUrl']} - Headers:
- Key:
X-Esri-Authorization - Value:
Bearer @{body('Server_Token_Response')?['token']}
- Key:

Unfortunately, this request will redirect to a different URL which contains the json file. The HTTP action does not automatically handle this, so some additional configuration is needed.
Click + New step and select the HTTP action. Change the name to “Get Edits Redirect”.
Configure it as follows so that a request is made to the redirected URL (the provided URL contains temporary authorization already):
- Method:
GET - URI:
@{outputs('Get_Edits')['headers']?['location']}
Using the overflow menu, click the Configure run after option.

Check only the has failed option and click Done. When the original request to get the edits fails due to the redirect, this second request will be made.

Once this new request completes, the edit results need to be processed and parsed. Click + New step and select the Parse JSON action. Rename the action to “Parse Edits”.
Since the response containing the edits is an actual file, the content needs to be converted to a JSON string first and then parsed. This is done by using the json function.
Set the Content to: @{json(body('Get_Edits_Redirect'))}
Set the Schema to:
This schema is generic for any change result but could be further customized to parse specific attributes if desired.

The last step to this flow is to send an email for each of the new damage assessment reports. In this case we are going to send the raw json of the features, but a more user-friendly message could be created if desired.
Since the change set may contain multiple layers, the first layer must be selected, and then for each new feature within that layer, an email should be sent.
Click + New step and add the Apply to each action.
Set the array to: @{body('Parse_Edits')['edits'][0]['features']['adds']}
Click Add an action and add the Send an email (V2) action.
Set the To address to your own email address.
Set the Subject to “New Damage Assessment Report(s)”.
Set the body to: @{item()}

Save the flow.
Note: To access specific attributes of a feature use an expression like item()['attributes']['fieldName']
Configure the webhook in ArcGIS Online
Copy the URL from the “When a HTTP request is received” trigger to the clipboard. We are going to use this URL to configure our feature service webhook.
Back in ArcGIS Online, open the feature service URL using the URL on the Overview tab. In the URL add “admin” between “rest/services” so that you can access the feature service admin APIs. The URL should be similar to:
https://services.arcgis.com/<redacted>/arcgis/rest/admin/services/Residential_Damage_Assessements
At the bottom of the admin page, click Web Hooks.

Next, click Create. Provide a Name for your webhook. Set the Change Types to FeaturesCreated so that this webhook only will trigger when new features are created.
Leave the Signature Key empty. If defined, a Signature Key can be used as an additional layer of security by allowing the webhook receiver to verify the sender.For simplicity we will not do this in the tutorial.
Paste the URL you copied from Power Automate into the HookUrl text box. This URL will be where ArcGIS Online sends information when features are created. Leave the remaining options alone.
Set the Content Type to application/json
It should look like this:

Click. Next, click Edit, set Active to True, and then click Edit to activate the webhook. Your feature service webhook is now activated and ready to use in Integromat.
Now let’s verify it works, in Power Automate click Test.

Then open your map in ArcGIS Field Maps and collect a new residential damage feature. You should receive an email after a minute or so that look similar to this:

Note: This may take a while to work because ArcGIS Online batches and schedules webhook events and the default interval is 30 seconds.
Summary
In summary, we started from nothing and were able to:
- Create a hosted feature layer
- Create a map
- Configure an incoming webhook as part of a flow with Power Automate
- Configure an outgoing webhook for the feature service
- Create a flow to process the new damage assessment features and send an email
Where do we go from here? There are many options beyond just emailing features. For example, we could expand this to support pushing the features into a hosted Excel spreadsheet. The nice thing is that a lot of what we built can be re-used.
Webhooks open up a lot of opportunities for automation without the need for coding and are a great way to streamline many workflows. We look forward to seeing what you come up with!
If you have specific requirements related to webhooks, we’d love to hear about it. Please email us at arcgisfieldmaps@esri.com.


Article Discussion: