Labeling oriented structure point labels in ArcGIS 10.1
Since the early days of ArcView 3, geologists have tried many solutions for the complex problem of placing, orienting, and labeling structural points. With the release of ArcGIS 10.1, Esri users at all license levels now have the power and functionality of Maplex labeling. Maplex allows precise rule-based placement and sizing of complex text and numeric labels, greatly improving the quality, readability, and amount of meaningful information that can be placed on a map.
Structural geology—the study of rock units in three dimensions—relies largely on oriented measurements at or near the surface to project trends below ground. Structural geologists want to understand how rocks were formed, how they have been deformed, and how they might have become mineralized. Structural geologists study and map rock units to answer several questions. What do the rocks look like at the surface? How do they behave at depth? Outcrop properties are often easy to map, yet detailed surface measurements also provide clues to what may be happening at depth.
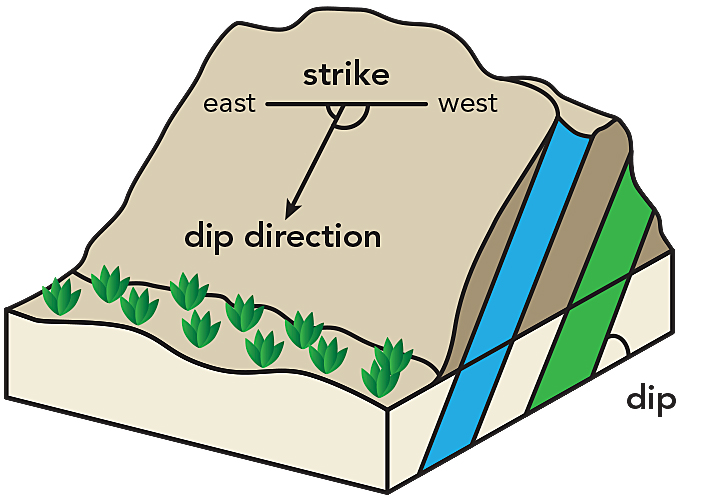
One of the most important orientation concepts is strike and dip. By measuring the orientation of rocks at the surface, structural geologists can “connect the dots in 3D” to project formations below the surface and define folded structures. With additional information, faults can be mapped and projected to define sharp displacements between offset blocks. If conditions are right, mineralizing fluids can travel upward along faults, depositing valuable minerals while causing temperature, pressure, and rock chemistry changes.
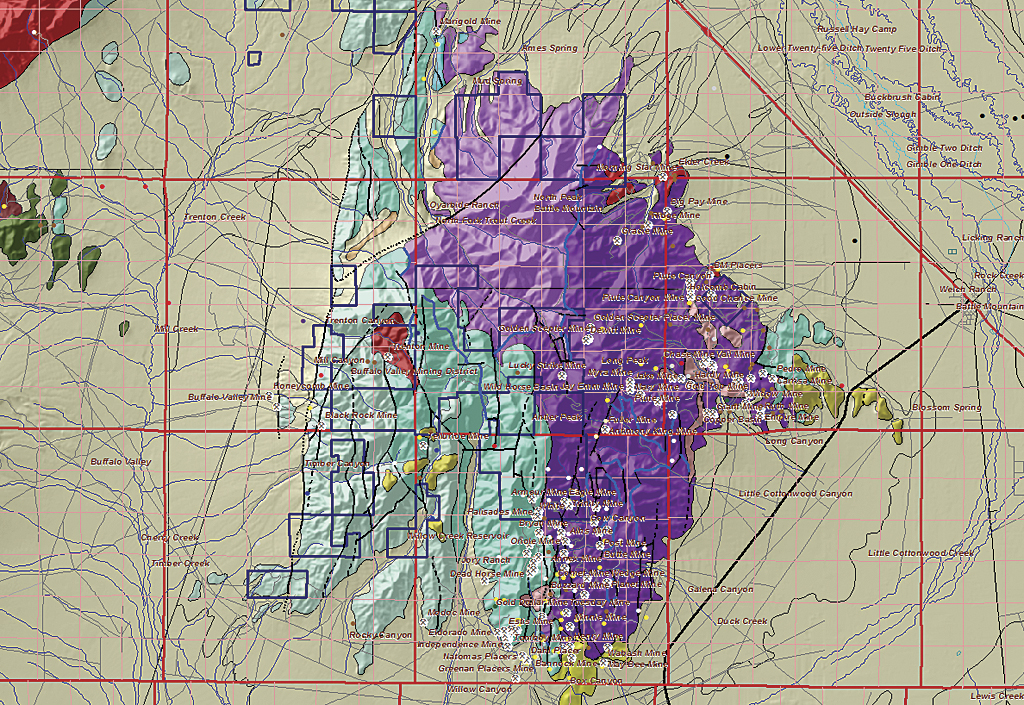
This exercise, like the previous two, uses data from Battle Mountain, Nevada. The 1:100,000-scale geologic mapping will be expanded to include extensive structural measurement data mapped at a detailed 1:24,000 (24K) scale. After adding 24K data for two mapped quadrangles, the next task will be to orient structural point symbols and use Maplex to place high-quality measurement labels on appropriate symbols.
Getting Started
Begin this project by downloading the sample dataset [ZIP] for this exercise. Use this dataset rather than the final version of the Battle Mountain dataset from the previous exercise. This new exercise requires new field data contained in this updated sample dataset. Rename any previous Battle Mountain master folders to avoid confusion.
Unzip the training data into a new Battle_Mountain folder. Use ArcCatalog to inspect this dataset. Inside the Battle_Mountain\GDBFiles folder, you will find a new file geodatabase named Geology_24K. This geodatabase contains one feature dataset named Structure, which contains a point feature dataset named Structure_Points1.
Start ArcMap, navigate to \Battle Mountain, and open Battle_Mountain01.mxd. Navigate to \Battle Mountain\GDBFiles\Geology_24K. Go inside the Structure feature dataset and add Structure_Points1. These points will load directly into the map. The coordinate system for the data frame is universal transverse Mercator (UTM) North American Datum 1983 (NAD 83) Zone 11 map. Open the Structure_Points1 attribute table and inspect the table’s fields. Note that this point data is standardized and clean, a rarity in the geology world. Leave the table open and save the project.
Strike, Dip, and Other Structural Measurements
Explore the attribute table for the Structure_Points1 layer. Sort on the [STRUCTTYPE] field and notice the various types of measurements. Inclined bedding is quite common, but there are also many occurrences of horizontal, vertical, and overturned bedding, along with something called compact foliation. All these records include values for [AZIMUTH] and [DIP]. Azimuth values range from 0° to 360° and dip values, measured down from the horizon, range from 0° for horizontal beds to 90° for vertical structures. While the LABEL contains no values, no fields contain NULL (or missing) values. Close the attribute table table.
These structural points are derived from digital datasets created during the geologic mapping of the Antler Peak and Galena Canyon 7.5′ quadrangles. These quadrangles, which cover a major part of Battle Mountain, provide excellent data for mapping and modeling. The point data in these quadrangles has been standardized so procedures behave well across both quadrangles. (See the “Summary and Acknowledgments” section at the end of this article for more information about and links to the source data.)
When measuring and recording geologic data, both strike orientation and dip parameters should be collected. strike is a bidirectional linear measurement that defines the intersection of an inclined plane and a horizontal surface. dip direction represents the steepest line of fall on the measured plane. It is the path a marble, influenced by gravity, follows as it rolls down the planar surface. Dip direction is a unidirectional measurement that is always perpendicular to strike. Dip angle is the angular measure of the difference between the inclined rock surface and the earth’s horizon. Figure 1 helps explain the relationship between strike and dip.
To simplify field measurements, dip direction is often combined with strike by applying the Right-hand Rule. To use the Right-hand Rule when measuring a strike azimuth, always keep the dip direction to the observer’s right, as though your right hand, palm side up, has fingers aligned with strike and your right thumb points “down-dip.” Use this method consistently to record the dip direction in a clockwise rotation relative to strike. Figure 1 illustrates the application of the Right-hand Rule. When taking field measurements, record the azimuth and dip angle. If the strike is intentionally or accidentally measured using the opposing or Left-hand Rule, consider standardizing to Right-hand Rule measurements as discussed in the section “Digging Deeper: Mapping Your Own Data” later in this article.
Symbolizing and Rotating Points in ArcMap
- In the table of contents (TOC), right-click Structure_Points1, choose Properties, and click the Symbology tab.
- In the Symbology window, click Import, browse to the \GDBFiles folder, and locate the Structure_Points1.lyr file. This layer file does not load data but does contain appropriate symbology that matches the numeric Style field, so assign STYLE to the VALUE field. Click OK twice to apply symbology.
- Zoom to the bookmark named Structure Points 1:24,000 and inspect the data. Notice that all point symbols are oriented with the long axis north to south and the dip to the east. These points all reference a strike azimuth of 0°, which will be fixed in the next steps.
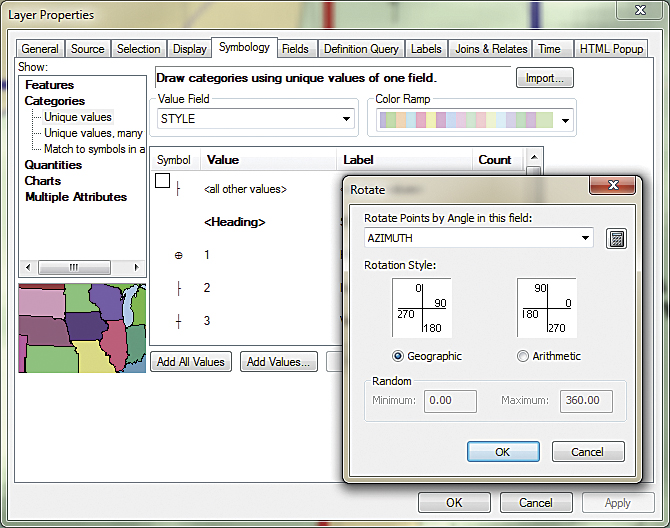
- Return to the Structure_Points1 Symbology tab, click the Advanced button, and click Rotation. Verify that Geographic azimuth is selected and set AZIMUTH as the rotation. Click OK twice and watch symbols rotate. While this looks “geologically good,” is it correct?
- To check the accuracy of the symbol rotation, load a small image of a clipped portion of a geologic map of Antler Peak. Navigate to Battle Mountain\JPGFiles\UTM83Z11, locate Antler_Peak_Sample.jpg, and load it into the map. Place the JPEG below the topography hillshade and inspect the rotated symbology to verify symbol position, type, and rotation. To see the symbols more clearly, temporarily change their color from black to a bright red or magenta.
- Turn off the JPEG and change the symbols back to black.
Before posting the dip values, some cartographic considerations are in order. The USGS 7.5′ quadrangle series is mapped at a scale of 1:24,000 (1 inch = 2,000 feet). To properly match standard symbol and label styles requires carefully respecting this standard scale. To do this, all the production decisions will be made in layout view. Switch from Data view to Layout view. Center the layout and use the map bookmark named Structure Points 1:24,000 to adjust the extent. Turn off the other labeled data (GNIS_Points and MILS Occurrences).
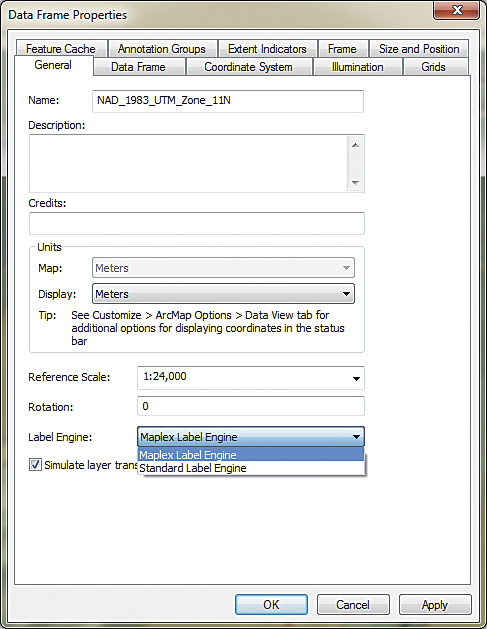
Next, set a reference scale of 1:24,000 for the data frame so the symbology and labels resize appropriately as the display is zoomed in and out. In the TOC, click the data frame and set a Reference Scale of 1:24,000. At the same time, set Maplex as the label engine. Click OK to close the data frame properties. Save the map.
Labeling Structural Points with Maplex
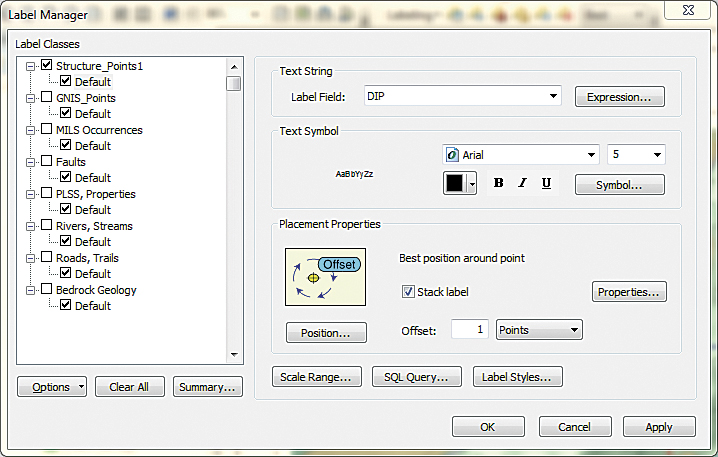
Load the ArcGIS labeling toolbar by clicking in an unused toolbar area and selecting the Labeling toolbar. Save the map again. In the Labeling toolbar, open the Label Manager and select Structure_Points1 to start labeling that layer. Study the point Label Manager to become familiar with its features.
Preliminary Label Criteria
- Check Structure_Points1 to place labels.
- Under Structure_Points1, select Default.
- In the Label Manager, set Label Field to DIP.
- Set Text Symbol to Arial 5 point black.
- Keep Stack label checked.
- Set Offset to 1 Points.
- Click Apply and continue to the Placement Properties Checklist.
Placement Properties Checklist
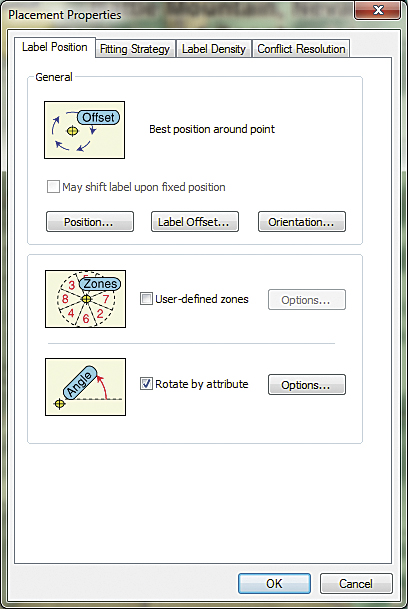
- In the Placement Properties area of the Label Manager dialog box, locate and click the Properties button.
- Click the Properties button to open the Placement Properties dialog box.
- Click the Label Position tab. Check the box for Rotate by attributes.
- Click the Options button next to Rotate by attributes.
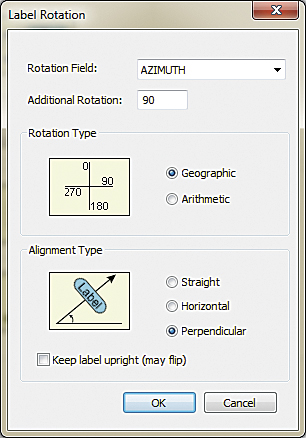
- Set Rotation Field to AZIMUTH.
- Set Additional Rotation to 90 (this is very important).
- Set Rotation Type to Geographic (rather than the default, which is Arithmetic).
- Set Alignment Type to Perpendicular (from the default Horizontal setting).
- Uncheck Keep label upright (at least for now).
- Click OK twice to return to the Label Manager.
- Review Label Manager settings and verify that Structure_Points1 is checked as the layer to label.
- Click OK once more and watch the labels post. Save the map.
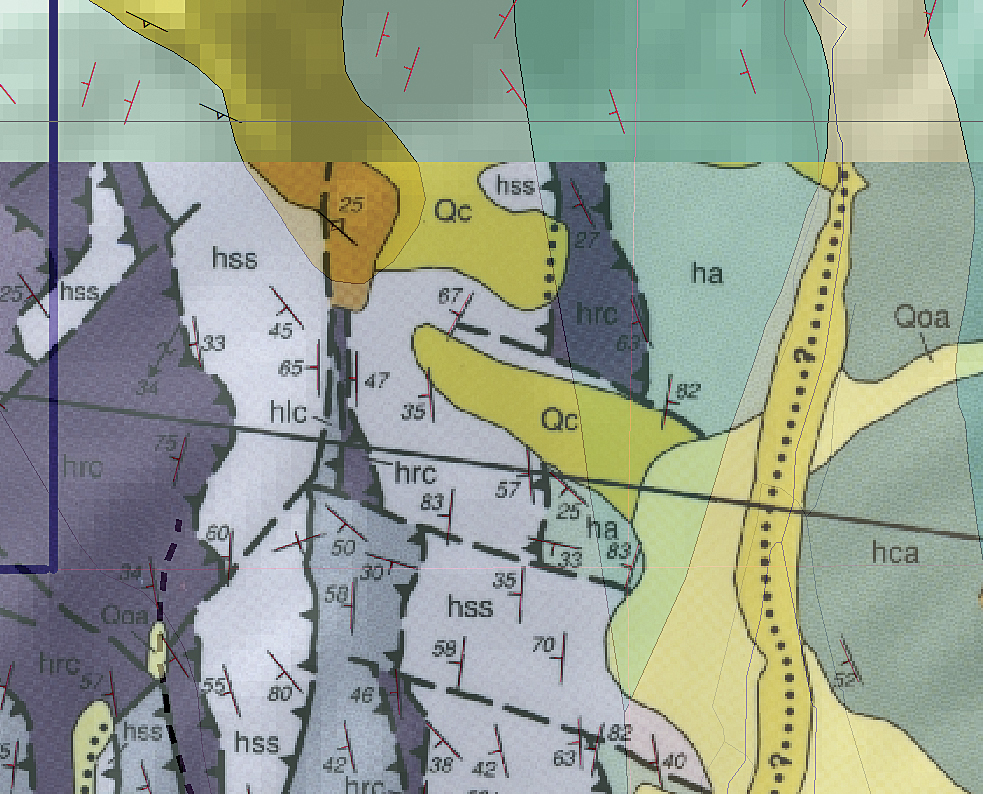
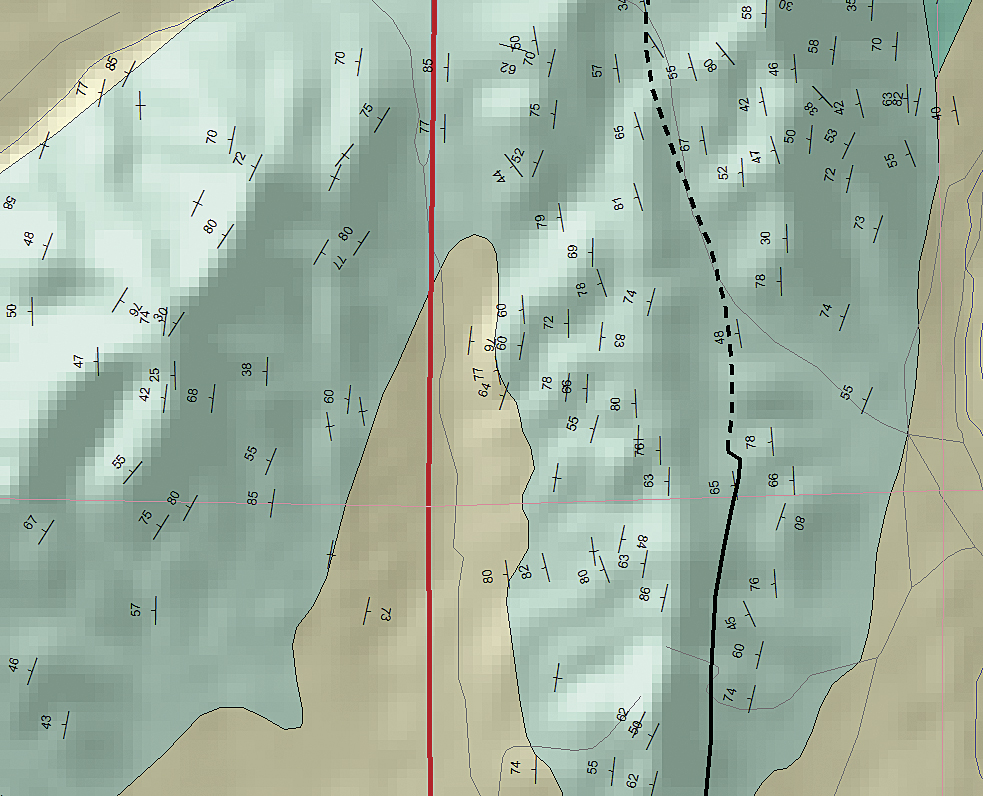
Using the Layout toolbar, zoom to a layout scale of 200 percent. Carefully inspect symbol size and rotation and labeling on the map. Compare the labels in this map to the labels in Antler_Peak_Sample.jpg. The rules set just applied posts labels on the down-dip side of an oriented symbol with a label axis parallel to symbol orientation, while labels in Antler_Peak_Sample.jpg symbols are positioned beside the symbol and are always horizontal. Which do you like better?
Labeling is truly a cartographic art form, so experiment with parameters. Here are just a few to try, but save the map first:
- Reopen the Label Manager and change the point size to 6.
- Change Offset to 0.
- Click the Properties button to open the Placement Properties dialog box.
- Click the Label Position tab.
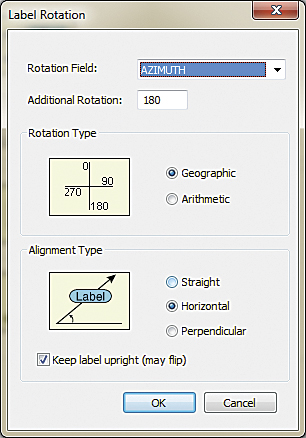
- On the Label Position tab, click Rotate by attribute > Options to open Label Rotation.
- Try an Additional Rotation angle such as 0, 180, or 270.
- Try Straight and Horizontal alignment.
- Check the Keep label upright box.
- For future reference, check out other Maplex placement tabs, including Fitting Strategy, Label Density, and Conflict Resolution.
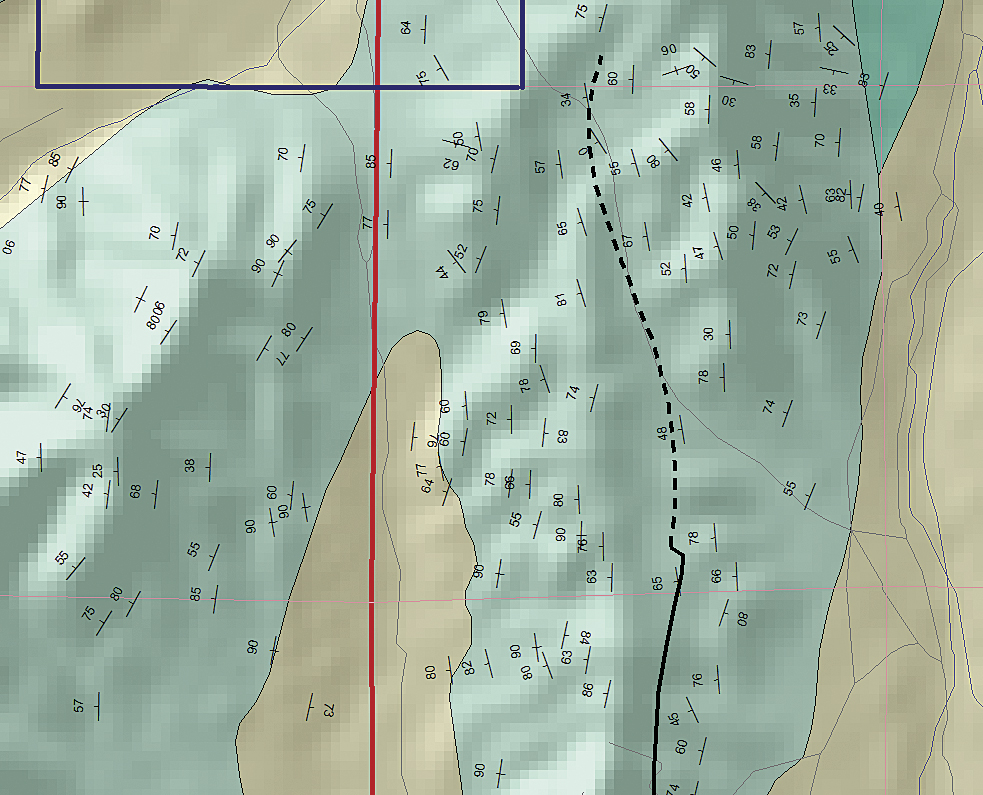
After reviewing how these setting changes affect label placements, use the Preliminary Lable Criteria and Placement Properties checklists to restore labels to the previous setting.
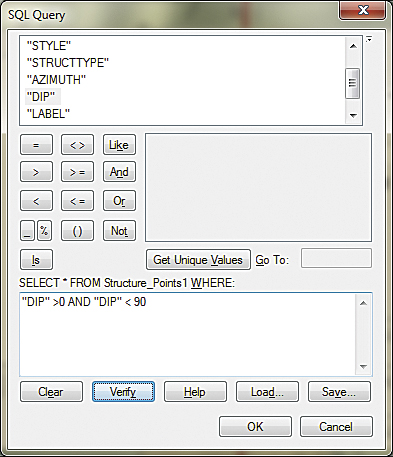
Let’s set a SQL query to label points with dip values that are greater than 0° and less than 90°. The horizontal bed symbol indicates the dip is 0°. A vertical symbol indicates a 90° dip. These two labels clutter the map but can easily be removed. In Label Manager, click the SQL Query button. Create the SQL Query “DIP” > 0 and “DIP” < 90=”” to=”” label=”” only=”” points=”” with=”” dip=”” values=”” that=”” are=”” greater=”” than=”” 0°=”” and=”” less=”” than=”” 90°.=”” save=”” the=””>
Reviewing the Map
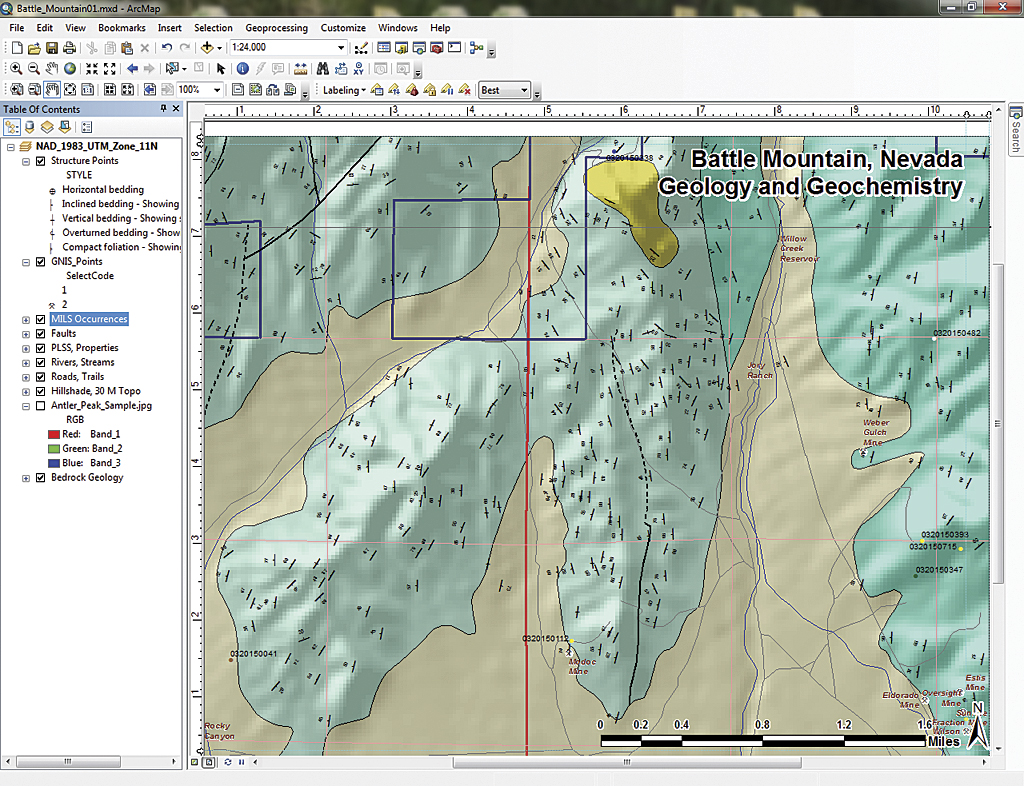
This exercise teaches how to use Maplex to properly label geologic structural points. First, let’s review the map and its enhanced labels.
Turn the GNIS_Points and MILS Occurrences layers back on and zoom the layout scale to 100 percent to preview the final map printout. In the TOC, change the name of Structure_Points1 to Structure Points.
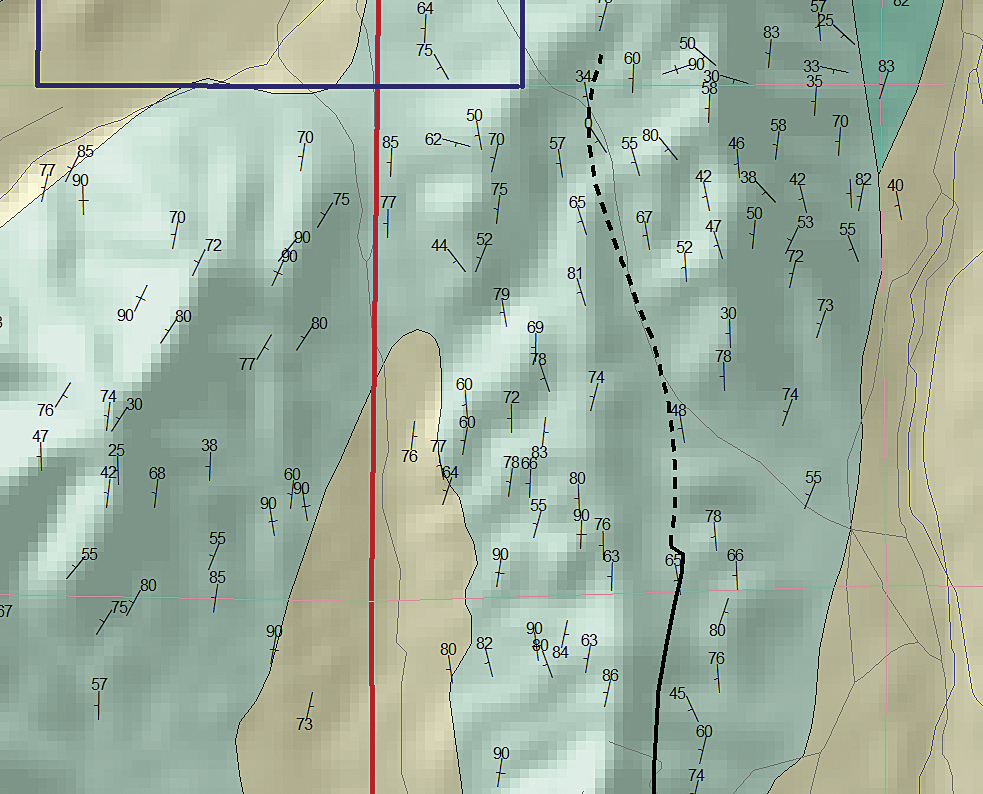
For one final look at the underlying 1:24,000-scale geology, turn Antler_Peak_Sample.jpg back on and study the Structure Points. Look over the mapped bedrock geology and structure lines shown in the image. Notice the additional detail not included in the original 1:100,000 data.
Digging Deeper: Mapping Your Own Data
Our sample data and its prebuilt legend have been classified, and appropriate symbols are associated with each data type. To use other geologic point data, thematically symbolize each individual data type using the Legend Editor. Classify the dataset using Unique Value and the field in the dataset that identifies the type of data. Assign the appropriate symbol from the Geology 24K style set.
If oriented field data or digitized points were recorded with a reversed field orientation that was improperly digitized, it may contain some Left-hand Rule points mixed with Right-hand Rule points. Since oriented symbols in the Geology 24K style set use Right-hand Rule, data that has both Right-hand and Left-hand points must be standardized by reversing the strike azimuth.
If you are certain that a strike azimuth must be switched, add 180 to azimuth values less than 180° and subtract 180 from values between 180 and 360. Keep notes listing the points that have been edited. If all data was captured using a Left-hand Rule, rotate all oriented symbology and placed labels by 180°.
Summary and Acknowledgments
The author truly appreciates the opportunity to use this excellent data to create training modules for geoscientists. The exercise uses the same basemap and regional geologic data presented in several recent ArcUser tutorials. New structural point data was obtained from two 24K quadrangle maps posted by the Nevada Bureau of Mines and Geology. If you wish to experiment with this data, it is available online: Geologic Map of the Antler Peak 7.5′ Quadrangle in Lander County, Nevada, Bulletin 109 (1995) [ZIP].

