Migrating to the Local Government Information Model
Learn a process for quickly and easily migrating source data to the Local Government Information Model using the ArcGIS Data Interoperability extension. This article is the sequel to “Preparing Data for the Community Maps Program,” which appeared in the fall 2012 issue of ArcUser and described a process for evaluating source data for contributing maps to the Community Maps Program.
Adopting the Local Government Information Model allows data to be easily contributed to the Community Maps Program, a collection of fast, authoritative, and freely available web maps compiled from premier GIS data sources. It also makes it possible to use the many other maps and applications that work in conjunction with this model. These resources address local government needs that range from public works to emergency management. The Local Government Information Model can be downloaded from the ArcGIS Resource Center at no charge.
Getting Started
To begin, download [ZIP] and unzip the tutorial data. This sample dataset was provided by the City of Palm Desert, California. To complete this exercise, you will need ArcGIS 10.1 for Desktop at any license level and the ArcGIS Data Interoperability extension. If you do not have a license for ArcGIS Data Interoperability, you can request a 60-day trial.
The ArcGIS Data Interoperability extension provides an easy yet powerful method for creating spatial extract, transform, and load (ETL) tools. A spatial ETL tool extracts source data, performs some manipulation or transformation, and loads the results into a destination dataset. The Workbench application in this extension allows you to create new spatial ETL tools and edit existing ones graphically.
In this tutorial, you will finish creating a spatial ETL tool that you will use to migrate a shapefile containing road centerlines to the RoadCenterline feature class in a geodatabase that uses the Local Government Information Model. The RoadCenterlineETL tool has been partially created and includes several transformers (which perform data manipulation) and a writer (data destination). To complete the creation of this tool, you will add a reader for the PDStreets shapefile data source and adjust the parameters of some of the transformers so that they execute correctly.
Adding a Reader
After downloading the sample dataset and unzipping it locally, you will begin completing the RoadCenterlineETL by adding the PDStreets shapefile as a reader.
Open ArcCatalog and activate the ArcGIS Interoperability extension by choosing Customize > Extensions.
Navigate to the folder where you unzipped the sample dataset. In this folder, click the CommunityMaps.tbx. Right-click the RoadCenterlineETL tool and choose Edit. The Data Interoperability Workbench opens the RoadCenterlineETL tool.

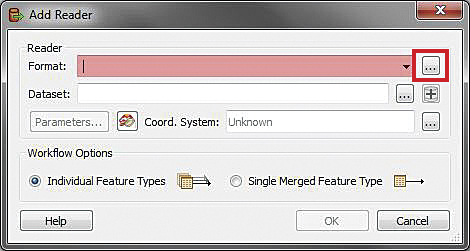
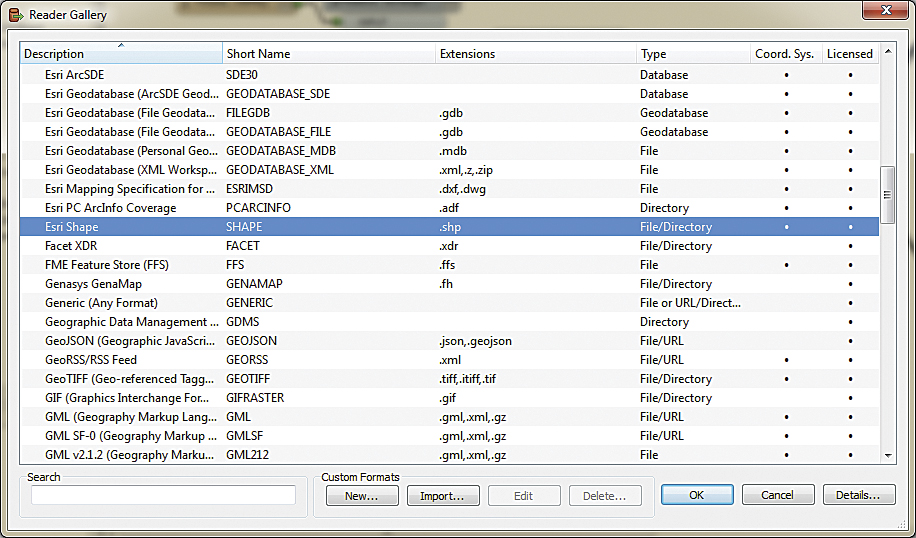
In the Workbench, choose Readers > Add Reader. In the Add Reader dialog box under Reader Format, click the ellipsis (…) button. In the Reader Gallery dialog box, scroll down the list and choose Esri Shape, and then click OK.
In the Add Reader dialog box, under Reader, Dataset, click the ellipsis button. Navigate to the tutorial data and select the PDStreets shapefile and click Open. Click OK to close the Add Reader dialog box. The Workbench will open the PDStreets shapefile, and you should see it added to the main window.
Now that the source data has been added to the tool, it needs to be connected to the first transformer. Use the Zoom In tool to zoom in on the reader and the first transformer. Connect the PDStreets.shp reader to the first transformer, RoadCenterlineCaseChanger, by clicking the yellow arrowhead on the reader and dragging it to the red arrowhead on the transformer.
In the reader, click the arrow to expand it and show the attributes. These attributes are from the PDStreets shapefile. This tool will change these attributes, so it is helpful to be familiar with the original attribute.
Edit the Transformers
Now that you have added the reader and verified that the writer is set correctly, you will complete the ETL tool by adjusting the transformer parameters. In the Workbench, scroll back to the left until you reach the beginning of the workflow.
Attribute mapping is carried out by dragging the output port (the arrowhead) of a source attribute to the input port of a destination attribute. Note the green, yellow, and red color coding showing which attributes have been connected. Green ports indicate a connected attribute, yellow indicates a source attribute unconnected to a destination, and red indicates a destination attribute unconnected to a source. Attributes with the same name in the source and destination are automatically connected. Attribute names are case sensitive, so a field named “TYPE” will not automatically be mapped to a field named “type” or “Type.” This mapping is sometimes implied rather than visualized, with no connecting arrow shown.
RoadCenterlineCaseChanger
The first transformer in the tool is RoadCenterlineCaseChanger. This transformer will perform bulk case changes on all the values in the attribute fields you specify. This is helpful for field values that will be used for labeling, so all labels for a particular feature class can be changed to have a uniform appearance.
Verify that the port on the PDStreets.shp reader is green. If not, click it and connect it to the RoadCenterlineCaseChanger transformer.
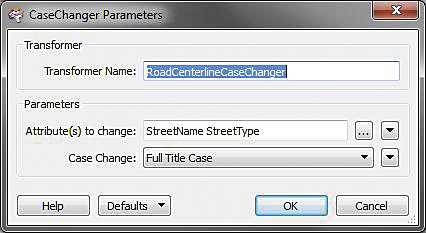
Next, click the ellipsis button on the RoadCenterlineCaseChanger transformer to edit its parameters. In the CaseChanger Parameters dialog box, click the ellipsis button next to Attribute(s) to change.
Check StreetName and StreetType and click OK. Verify that Full Title Case is selected for Case Change. Click OK to close the CaseChanger Parameters dialog box and scroll to the next transformer.
RoadCenterlineROADCLASSValueMapper
RoadCenterlineROADCLASSValueMapper will take values from the Class field in PDStreets.shp and match them to values in the ROADCLASS field in the RoadCenterline output feature class. This is necessary because the Local Government schema has a specific domain of values for the different classes of roads. This cuts down on errors and ensures that roads of various types (e.g., highways, local roads) are symbolized uniformly throughout the map. Specify the PDStreets Class field as the source of values for the ROADCLASS field in the RoadCenterline feature class and identify specific value mapping that should take place.
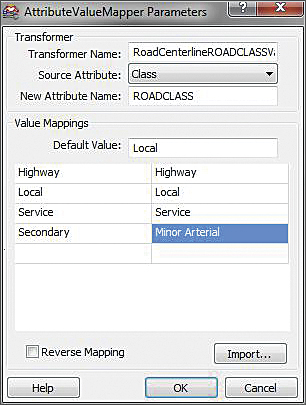
Open the parameters for the RoadCenterlineROADCLASSValueMapper transformer. In the AttributeValueMapper Parameters dialog box, choose Class from the drop-down list for Source Attribute.
To import the Class values from the PDStreets shapefile to populate the dialog box, click the Import button. Although you could enter them manually, importing them is quicker.
In the first panel, click the Change button and the ellipsis next to Dataset. Navigate to the tutorial data, click PDStreets.shp, and choose Open. Click Next on the first panel.
On the Select Feature Types panel, verify that PDStreets.shp is listed, then click Next.
In the Key Attribute panel, select and double-click the Class attribute, then click Next. This will import the unique values for the Class field into the ValueMapper dialog box.
In the Value Attribute panel, click Class, then click Next. Wait while the Class field in PDStreets is scanned for unique values. There should be four unique values found.
Click Finish on the Scanning Attributes panel. Click OK on the message box that provides the result of the scanning. Click Finish on the final panel.
Now that the values from the Class field have been added, you will map them to their corresponding values in the ROADCLASS field in the RoadCenterline feature class. You could find these values by looking up the ROADCLASS coded value domain in the Local Government Information Model, but since there are only four unique types of roads in the source data, use the values in Table 1.
As you can see, there is only one value that needs to be changed. Roads with a Class value of Secondary in the source data will have a ROADCLASS value of Minor Arterial in the output. Use the values in the table to complete the mapping in the AttributeValueMapper dialog box. For Default Value, type Local. Click OK to close the dialog box.

Populating the FULLNAME Field
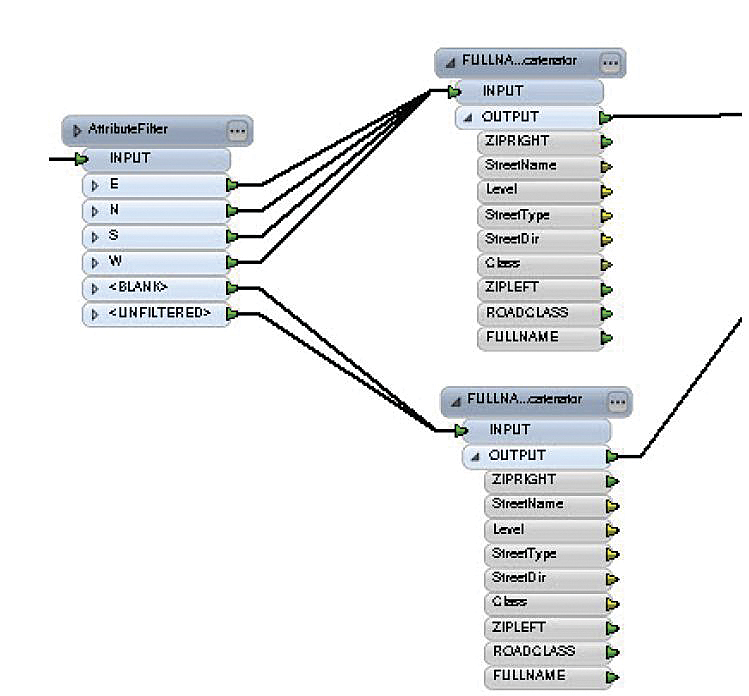
Now that you have edited the parameters for the ROADCLASSValueMapper transformer, continue scrolling to the right to the next group of three transformers: the AttributeFilter, DirectionsConcatenator, and NoDirectionsConcatenator.
The three transformers in this tool work together to take multiple fields from the input source data and load their combined values into one field in the output. In this case, this is necessary because the full name of the street features is divided up into different fields in the PDStreets shapefile, but the Local Government model requires that the name be stored in one field called FULLNAME for labeling purposes.
AttributeFilter
The first transformer in the group is AttributeFilter. It divides up the input records based on whether they have a value for the StreetDir field. This might not seem like an important step, but if you look at the attributes for PDStreets.shp, you will notice that the majority of streets do not have a StreetDir value. Click the ellipsis button to open the parameters for the AttributeFilter transformer to verify that StreetDir is selected as the Attribute to filter by. Close the AttributeFilter Parameters dialog box.
DirectionsConcatenator
Now click the ellipsis button on the FULLNAME with DirectionsConcatenator transformer (the top one) to open the parameters dialog box. Notice that Destination Attribute is set to FULLNAME and that the Concatenated Items include StreetDir, StreetName, and StreetType. The constants between the items represent spaces. At the bottom of the dialog box, you can see a preview of the concatenation. Close the parameters dialog box.
NoDirectionsConcatenator
This concatenator does not include the StreetDir field. Only records that have a blank StreetDir value will go through this concatenator, which will avoid the possibility that an empty StreetDir field could be concatenated with the StreetName and StreetType fields. Open the dialog box for the FULLNAME NoDirectionsConcatenator transformer to verify that it does not include the StreetDir field. Close the parameters dialog box. Scroll to the end of the tool so that you can see the two concatenator transformers and the writer. In the Workbench, click the Save button to save the changes you have made to the RoadCenterlineETL tool.
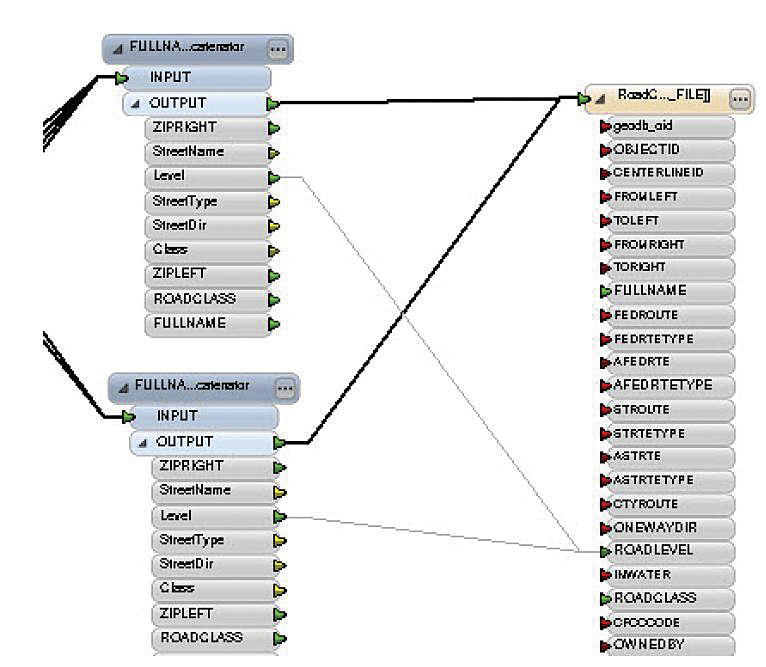
At this point, you can see which attributes from the PDStreets shapefile will be mapped to attributes in the RoadCenterline feature class. Since there are many transformers between the source feature class and the destination feature class, attribute mapping will be done from the last transformers in the workflow to the destination feature class.
Connecting the Level Field
The remaining unmapped field is Level. This field has a match in the RoadCenterline destination feature class, but the name is slightly different.
Connect the Level field to the ROADLEVEL field in the destination by clicking the yellow port and dragging it to the red one. Make sure to do this for both concatenator transformers.
There are still many attributes in the destination feature class that are not mapped to source attributes. This is acceptable. Every field does not have to be mapped to the Local Government schema—only fields that control labeling and cartography for the layer being contributed. Unmapped destination attributes will simply not contain values.
Run the RoadCenterlineETL Tool
One of the benefits of performing data migration in the ArcGIS Data Interoperability extension is that it provides comprehensive logging. Whenever a tool is executed, information about the process is sent to the Log window in Workbench and also stored in a log file. This log file can provide information that is helpful in performing quality control on the data migration workflow or troubleshooting problems with a specific ETL tool.

In Workbench, click the Prompt and Run Translation button (with question mark and green triangle icons). Here you will set the destination path and verify the source path. Click the ellipsis button beside Destination Geodatabase and navigate to where you saved the tutorial data. Choose PalmDesertLocalGov.gdb and click Open. Click the ellipsis button beside Source ESRI Shape File(s) and once again go to the location where the tutorial data was saved. Choose PDStreets.shp and click Open. Click OK.
Notice the information being sent to the Log window. When the tool has finished running, you will receive a message in the Log window that the translation succeeded. The number of translated features will be displayed on the connection arrows in the main display. If the RoadCenterlineETL tool did not finish successfully, go back through the prior steps in this tutorial and investigate the Log window information to determine what went wrong.
Once the tool has executed, verify that the PDStreets features have been migrated to the RoadCenterline feature class. Close the RoadCenterlineETL tool. When prompted to save, click Yes. In ArcCatalog, navigate to the tutorial data. Right-click the data folder and choose Refresh.
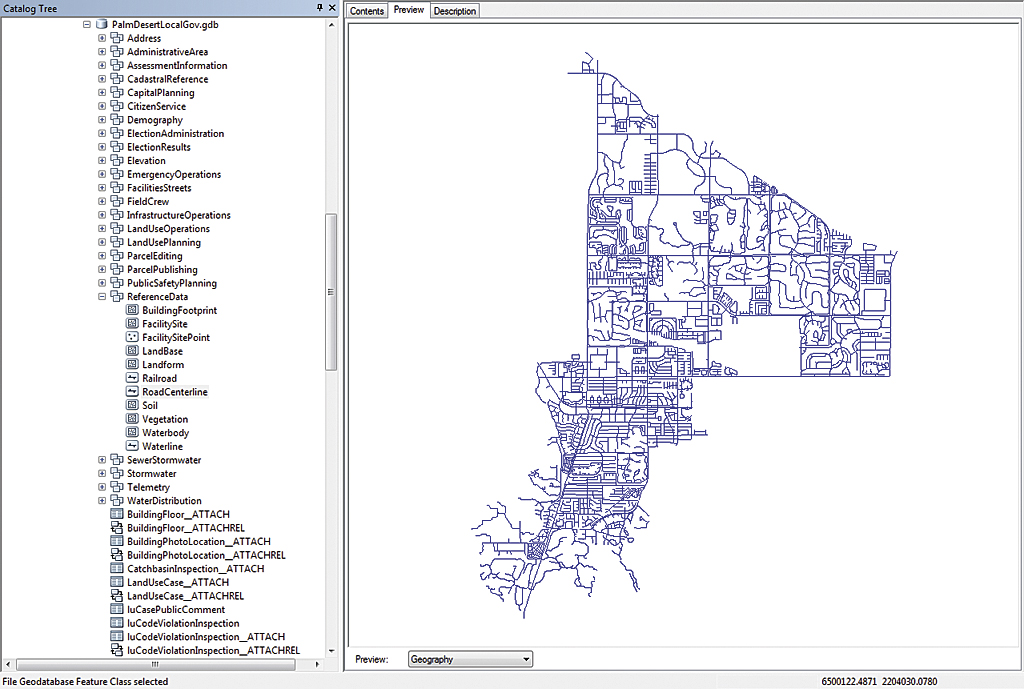
Navigate to the PalmDesertLocalGov geodatabase > ReferenceData > RoadCenterline feature class. Click the Preview tab to display the RoadCenterline feature class lines. Choose Table from the Preview drop-down list. Scroll over to the FULLNAME field and verify that the StreetDir, StreetName, and StreetType values from the PDStreets shapefile have been combined into this field.
Scroll to the ROADLEVEL and ROADCLASS fields to verify that their values were also populated from the PDStreets shapefile. Once satisfied that the migration was successful, close ArcCatalog.
Conclusion
In this exercise, you edited an existing spatial ETL tool to enable the migration of a shapefile to a geodatabase feature class using the Community Maps version of the Local Government Information Model schema. The ArcGIS Data Interoperability extension allows you to construct tools that complete an entire migration workflow in one operation. For more information on how the ArcGIS Data Interoperability extension is used in the Community Maps Program, visit the Community Maps Program Resource Center help documentation. For more information regarding the Community Maps Program, send an e-mail to communitymaps@esri.com.

