As an organization administrator, you may be looking for more efficient and effective ways to manage members, content, credits, and activities in your ArcGIS Online organization.
For example, you may want to compare member credit usage to help with credit budgeting. Or, if your goal is to reduce storage costs, you may need to monitor file and feature storage to identify unusually large items.
The organization status dashboard, accessible from the Organization page Status tab, provides a good overview of your organization. But if you need more detailed, on-demand information that you can easily download and share, administrative reports are your best option.
This article describes the four report options in ArcGIS Online and explains how to create, find, and use them. The article also shows you how to get the most out of administrative reports by scheduling them to run automatically.

Types of Reports
ArcGIS Online has four report types—member, item, credit, and activity. They are generated as comma-separated value (CSV) files that can be opened and sorted using a spreadsheet program such as Microsoft Excel.
Member Report
This report generates a comprehensive list of members in your organization at the time the report is created. The member report includes details about each member, such as their assigned user type and role, username, available credits, and add-on apps.
Item Report
An item report provides a snapshot of all the content items in your organization at the time you run the report. For example, you can see the name of the item, the item owner, its share level, and storage size, as applicable.
Credit Report
A credit report lists the number of credits consumed by each member in your organization throughout a specified week or month. Credit usage is broken down by credit-consuming tool, such as geocoding, geoenrichment, and spatial analysis.
Activity Report
An activity report shows changes made to your organization members’ groups and content for a day, week, month, or year you specify. It provides details about added, created, updated, shared, or deleted items, and other item information. The activity report also provides details about member management actions—for example, updated member roles, password resets, and group assignments.
Create Reports
Now that you understand the different types of reports available, it’s time to create a couple of reports.

Create a Credit Report
Suppose you’re interested in credit usage in the month of December.
- Go to Organization > Status > Reports and click Create report.
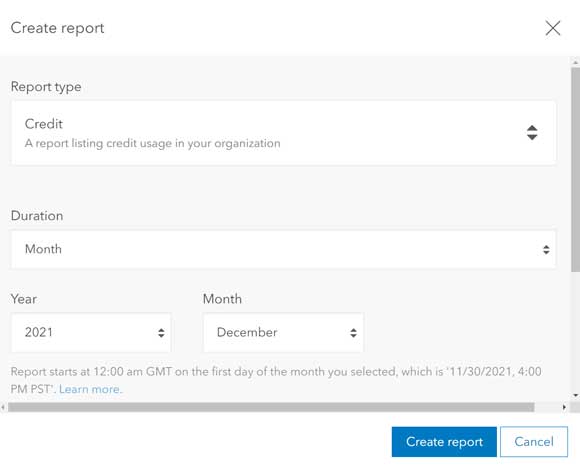
- Choose Credit as the Report type. Select Month for the Duration and choose 2021 for Year and December for Month. Keep the default report name and click Create report.
- While your report is being generated, the pending reports indicator is displayed. Once the report appears in your list, you can download it from the Reports tab or from its item page, since each report is automatically saved as an item in your content.
- Note: If another administrator has already run the same report, you cannot run it again. You can download the existing report on the Reports tab.
Open the report’s item page. - Click Download and open the report. Optionally, you can update the item details and share the report with your organization or a group.
Create an Item Report
Now suppose you want to identify which file and feature layer items are taking up the most storage space in your organization.
- On the Reports tab, click Create report.
- Select Item for Report type, accept the default report name, and run the report.
- Download and open the report.
- Scan the storage size columns—File Storage Size and Feature Storage Size—to see which items are largest in terms of storage. If there are many items, you can sort on either column to easily see which are the largest files or features. Storage size is reported in bytes, but you can apply a mathematical formula—/( 1024 * 1024)—to convert bytes to megabytes.
Find Existing Reports
You can find existing reports on the Status tab of the Organization page. Choose Reports on the Status tab. To help you find a report, you can search or filter by report type or date created.
Schedule a Report
For organization activities and actions your organization wants to monitor on a regular basis, consider scheduling your reports to run automatically.
On the Reports tab, click Create report.
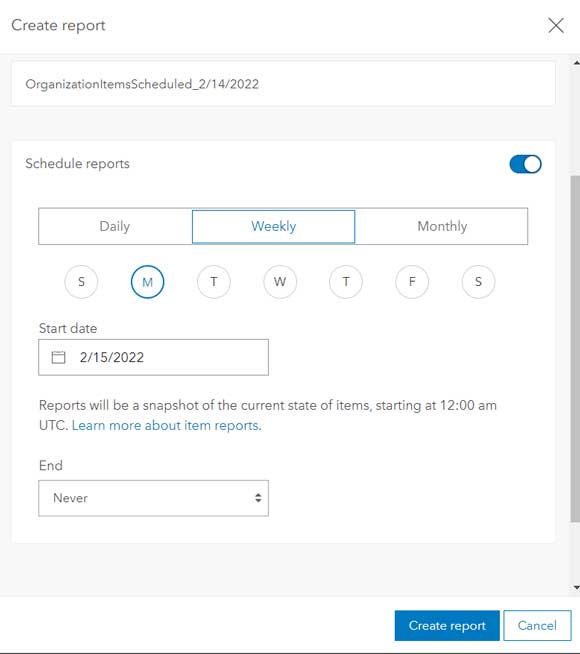
- Set the report parameters and turn on the Schedule reports toggle button.
- Choose a cadence, start date, and optional end date for the report.
- Click Create report.
- Now the report will run automatically without any further effort on your part!

Learn More
Read best practices for ArcGIS Online organization administrators in this blog, “Time-saving tips for managing members in ArcGIS Online.”
Check out the latest resources for ArcGIS Online, including discovery paths, blog articles, and help documentation.
Download this guide to essential tasks and best practices for setting up ArcGIS Online.
Join the Esri Community and visit the ArcGIS Online section to exchange ideas, solve problems, and build relationships with the ArcGIS Online community.


