This article describes how administrators can implement custom roles and presents an example showing how roles were implemented in a real ArcGIS Online organization.

Core Roles and Custom Roles
A role is simply a collection of privileges that can be assigned to a group. It controls what actions members of that group can perform and what services they can use. There are three core roles that are preconfigured for all organizations: User, Publisher, and Administrator. These core roles are a good start for providing members with what they need to use the various features and services ArcGIS Online offers.
The downside of sticking with just the core roles is that administrators must place each member into one of these three preconfigured buckets. These buckets may not fit your requirements from a management or security perspective. For example, you might want all members to participate in open data activities (not just Administrators). You might need to limit the use of GeoEnrichment Services to just a few people (not all Publishers). Designing and configuring your own custom roles will help you impose or relax permissions as required to fit the needs of your organization.
Privileges
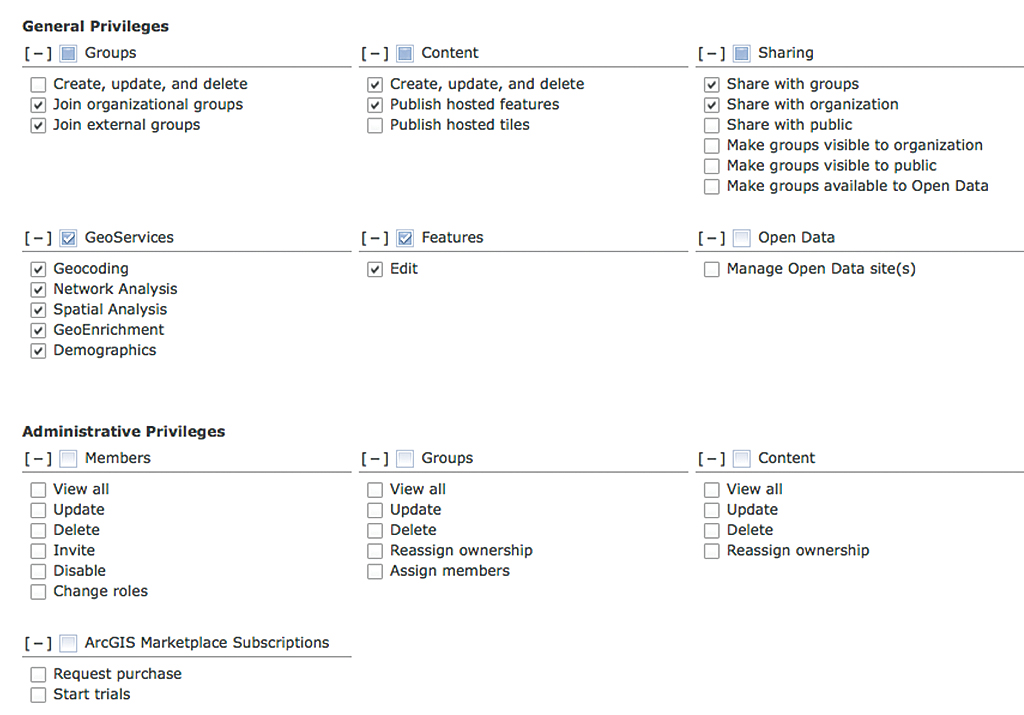
There are two main categories of privileges, General and Administrative, that can be assigned to each custom role. General privileges relate to members creating, using, and sharing their own items and groups. Administrative privileges enable members to view and manage all users’ groups and items.

There is also a set of reserved privileges. Reserved privileges are only available to members in the core Administrator role and cannot be assigned to any custom roles. Examples of reserved privileges include configuring custom roles, removing other administrator accounts, and viewing and editing the organization’s configuration settings.
In creating a custom role, you simply review the list of general and administrative privileges and enable the ones required by a collection of members. To get started, you can use one of the available custom role templates, such as Analyst, Author, or Student.
Benefits of Using Custom Roles
ArcGIS Online provides incredible value for its cost, and most organizations include sufficient credits to cover anticipated annual usage. But as an administrator, it’s your job to manage your organization, so you’ll want to implement sensible policies and controls that minimize wasteful or mistaken usage of ArcGIS Online credits and also provide security.

As you manage your organization, it is likely that you will outgrow the core roles. You’ll notice yourself being conflicted about which role to place a new member in. When this occurs, you should configure custom roles so you can assign members only the privileges they need to perform their job function.
There are several areas where administrators will see benefits from using custom roles. Improve security in your organization by allowing actions based on role (i.e., job function). For example, only authorized members should be able to share maps with the public. Reduce unwanted/mistaken credit usage by limiting access to credit-using functionality such as GeoEnrichment and geocoding. Simplify management by changing many members’ privileges with a single action.
Strategy for Implementation
The recommended way to implement custom roles is to start by considering the creation of a role for each job title in your agency, department, or company. You will mimic your organizational structure inside ArcGIS Online. From there, you can look for opportunities to consolidate or break out roles as needed, based on how people in different job functions use ArcGIS Online.
The creation of custom roles for Esri’s National Government Sales team provides an example. After the custom roles feature was enhanced with additional privileges in July, I took a look at our National Government Sales team and thought about how custom roles would look for my organization of 220 members. Job titles on our sales team include a director, sales industry managers, sales team leads, account executives, and account managers. In technical positions, we have solution engineers and solution architects.
We also work with geospatial analysts and project managers in Esri’s Professional Services division, training specialists in the Education Services division, and product engineers and developers from the core software development team.
One possible solution would have been to create a role for every type of job title. However, this typically would be an overly complex solution that would have created additional administrative overhead.
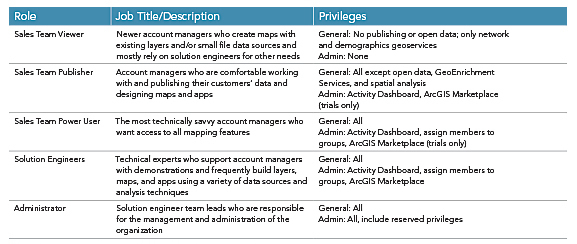
Instead, I decided to consolidate and expand roles beyond just job titles. Here’s how I did it. I combined solution engineers and architects into a single role. These technical staff utilize ArcGIS Online in a similar way and can share the same set of privileges. I then created three roles—Sales Team Viewer, Sales Team Publisher, and Sales Team Power User—with gradually expanding permissions.

Job responsibilities and experience with ArcGIS Online varies greatly among members of our team. Some are very comfortable publishing services and running analysis tools, while others mostly create maps using existing layers and rely on solution engineers to help with more advanced tasks. All roles can create, manage, join, and share items and groups. Table 1 summarizes the roles, job function, and privileges for each custom role on the sales team.
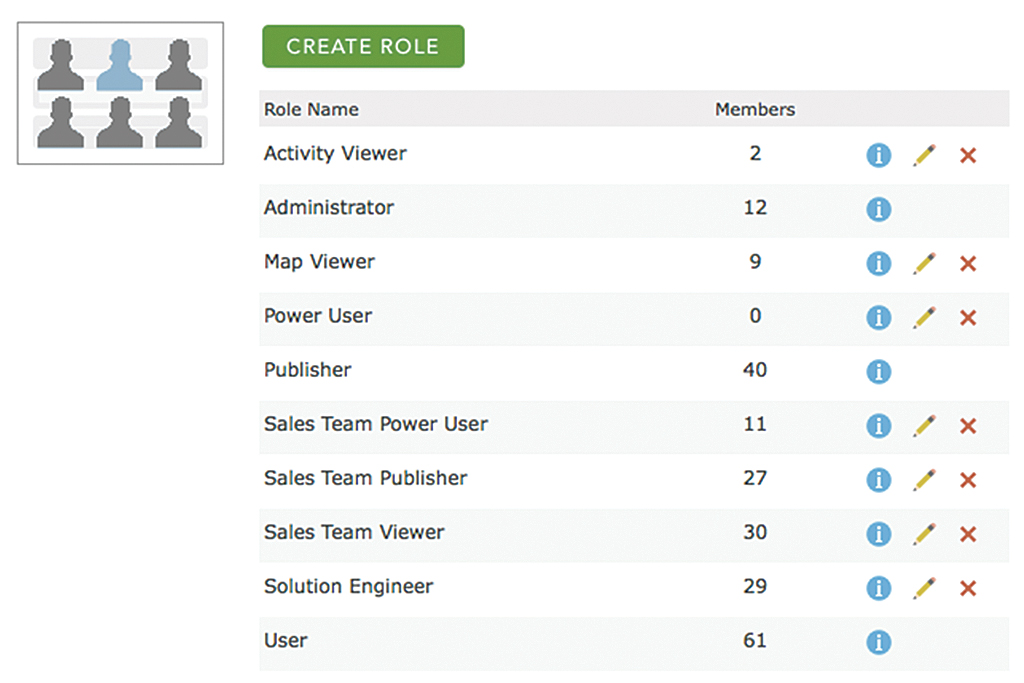
Earlier, I mentioned that the National Government Sales team also works with other teams within Esri. For these external collaborators, I created several additional roles that have similar privileges to their sales team counterparts. Having these roles helps administrators keep track of how many external collaborators have been invited into our organization and also enables us to change privileges for sales team and external staff independently, if needed.
Finally, I created an Activity Viewer role to provide access to Activity Dashboard for our sales director and other staff who required visibility into how we use our ArcGIS Online organization.

