Whether you’re a researcher, planner, or first responder, working with coordinates can be an integral part of your workflows. Until now, there wasn’t an easy way to enter coordinates when editing features in ArcGIS Online. Enter tooltips- a handy little tool that helps you edit with accuracy. With the June 2024 update, we’ve improved tooltips to enable you to map with coordinates. In this article, we’ll walk you through using tooltips to plot a point using coordinates in Map Viewer. Let’s dive in.

Tooltips
Tooltips provide real-time feedback while you edit features. This feedback includes measurements, like the length of a line, and dimensions, like the area of a polygon. Earlier this year, tooltips became interactive, enabling you to input your own values for fields like distance, direction, and length. For more information, check out our previous article, Tighten Up Your Edits with Tooltips.
We’ve recently added new input fields to tooltips, including Longitude and Latitude. You can use these fields to enter coordinates when placing a feature on a map.

Map a Point by Coordinates
Imagine you manage data including radio tower locations. Someone gives you a set of coordinates and asks you to add a new tower at that location. Thanks to tooltips, that’s easy. We’ll walk you through it step by step. Use this map to follow along.
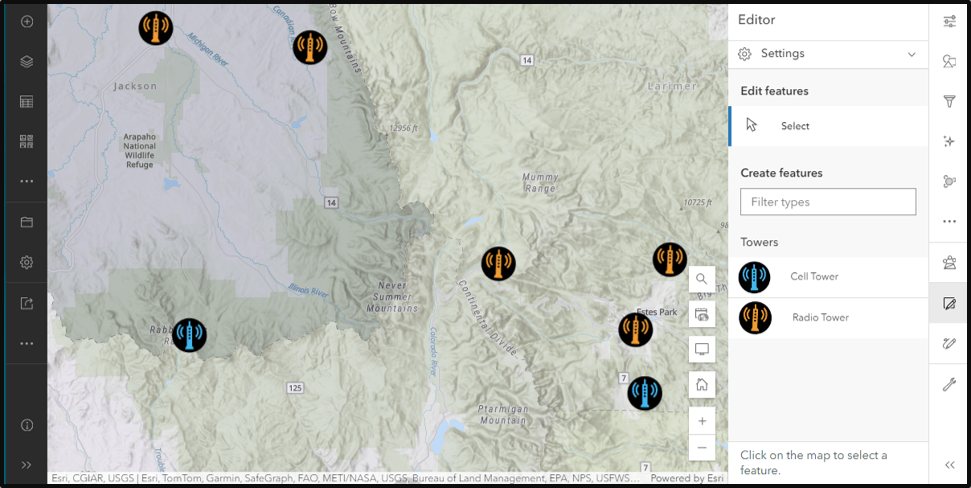
Step 1: Enable Tooltips
When tooltips are enabled, they hover to the lower right of the cursor while you edit.
- Click Edit on the light toolbar.
- Expand Settings.
- Toggle to Enable tooltips.

Step 2: Make Tooltips Interactive
- Under Create features, select a template.
- Move the cursor over the map.
- Notice the tooltips.
- Click [Tab] to enable input mode.
- [Tab] to navigate between fields.
![Press [Tab] to make the tooltips interactive.](https://www.esri.com/arcgis-blog/wp-content/uploads/2024/06/Toolitps-Input-Mode-002-350.png "Press [Tab] to make the tooltips interactive.")
Step 3: Enter Coordinates
- For Longitude, enter: -106.293570
- For Latitude, enter: 40.356250
- Click Enter.
- Double click on the map to finish drawing the feature.
- Complete the form.
- Click Create.
You’ve just learned how you can use precise coordinates to place a point on the map. It doesn’t stop there. When creating or updating a vertex for other features like lines and polygons, you can use coordinates to place a vertex at a specified location.
Best Practices
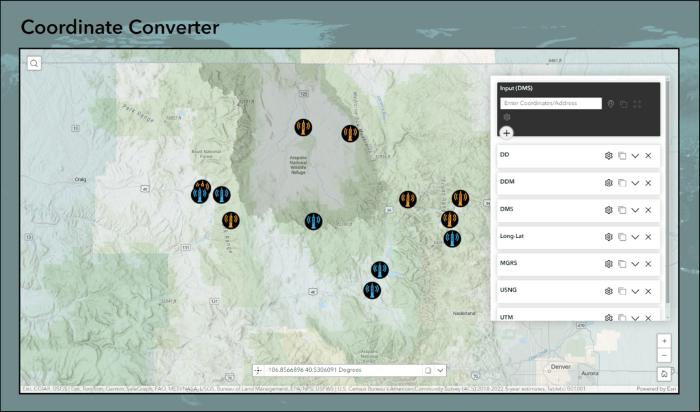
At this time, tooltips work best with decimal degrees (DD). If your coordinates are in a different format, Experience Builder’s coordinate conversion widget is a handy tool for quick conversion. Check out this simple app featuring the widget. Just enter a set of coordinates, or click Add Point, then place a point on the map to see the coordinates converted into several different formats.
Tooltips are supported in Map Viewer, Scene Viewer, ArcGIS Web Editor, and work with both Sketch and Editing tools.
Summary
The editing experience in ArcGIS Online is constantly evolving. With the latest update, we’ve added more options for editing with tooltips, enabling you to create and update features with greater precision. Stay tuned for more improvements in the coming months, and don’t forget to contribute your own ideas and comments to the conversation on Esri community.


Commenting is not enabled for this article.