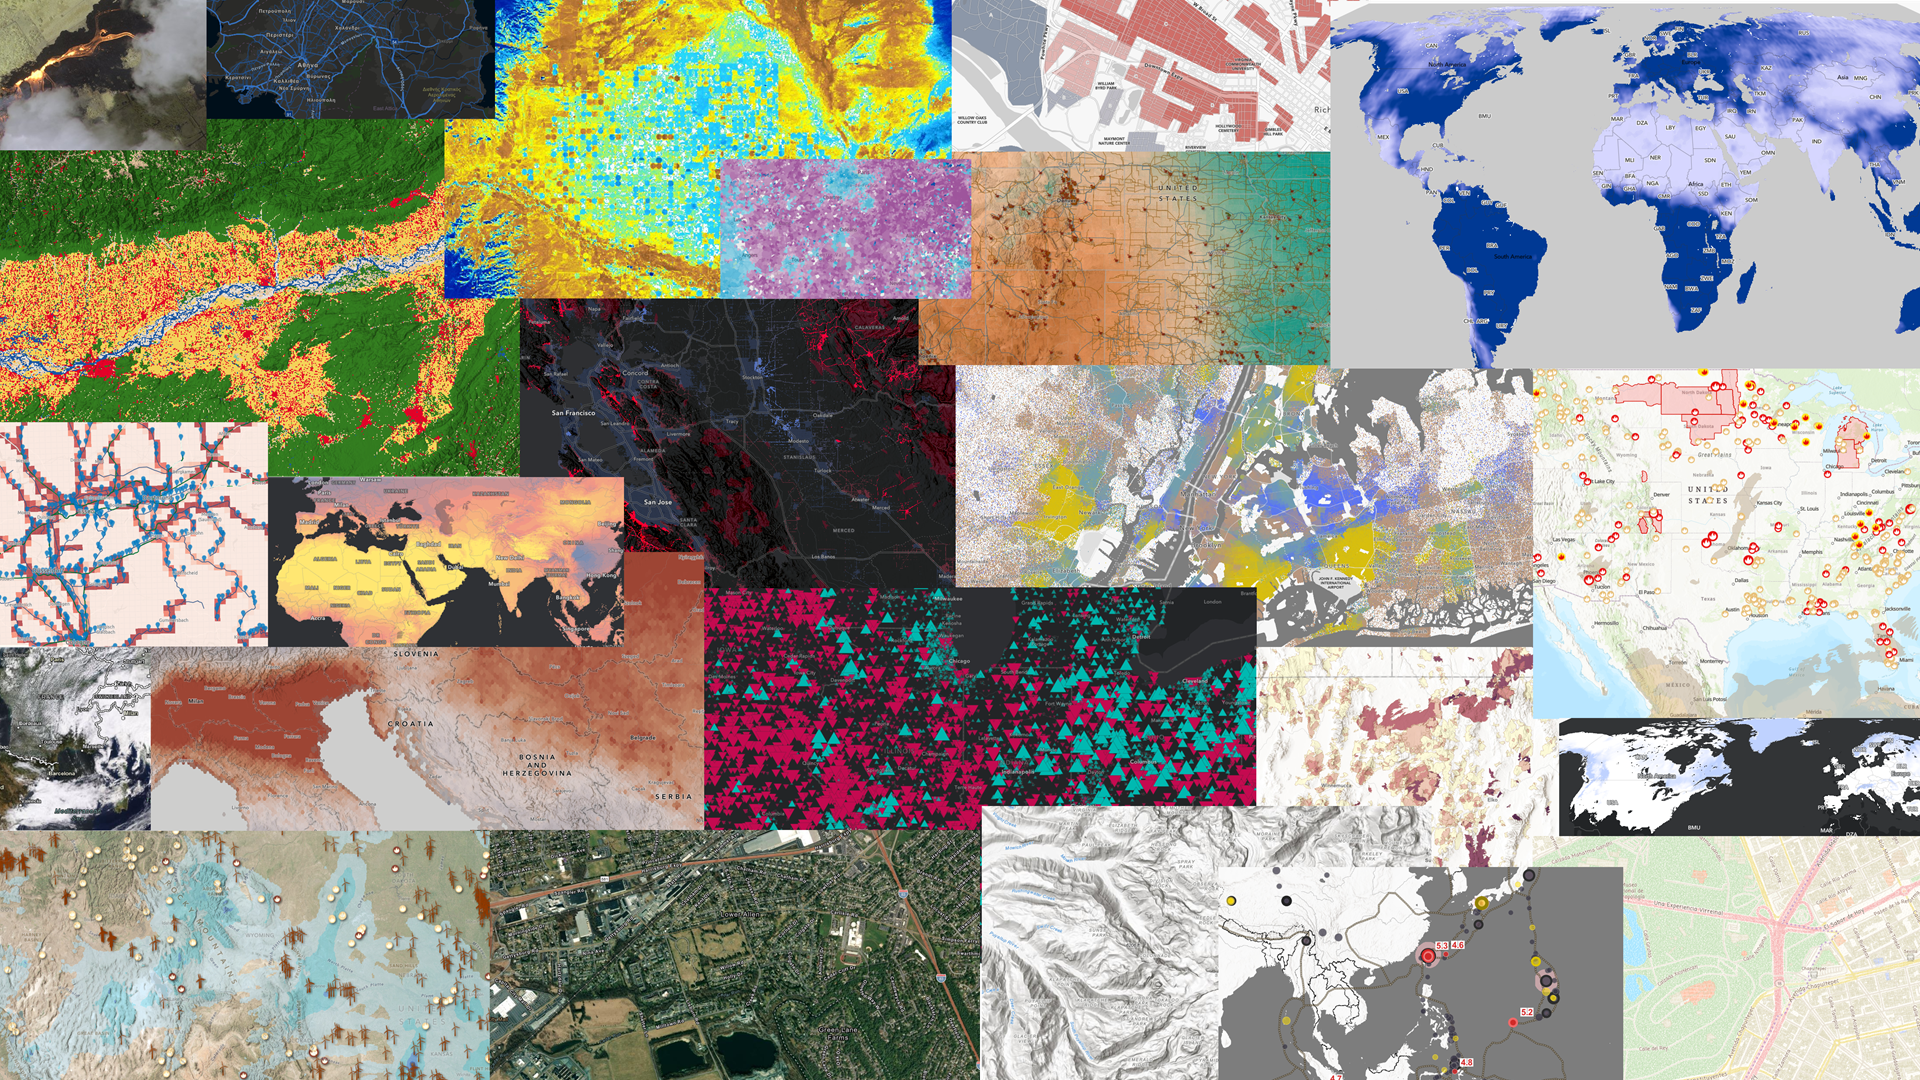
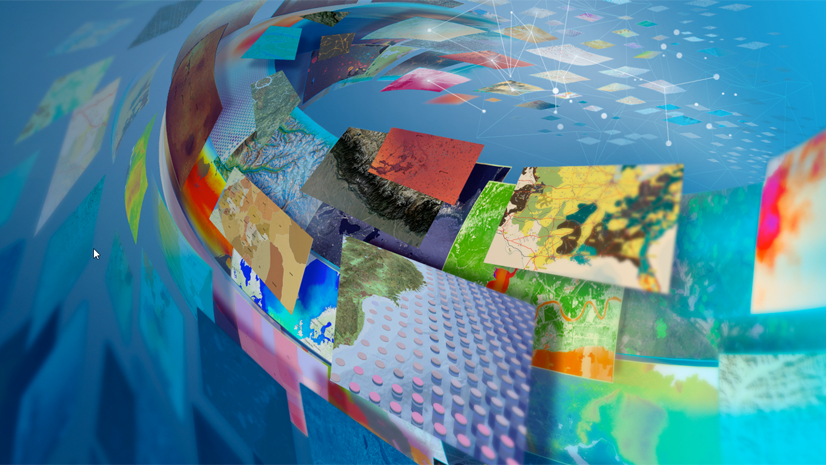
A great map starts with great data. But finding the data you need for your specific project isn’t always an easy accomplishment. The traditional workflow has always been to go find a data source, download the raw data, process it into the format you need, fumble through the nuances of metadata, and then you’d finally start your real GIS work. Luckily, ArcGIS Living Atlas of the World is a resource included within ArcGIS to help address this need for easily accessible, quality spatial content. But Living Atlas is far more than just data. It spans the possibilities of web GIS by offering spatial content in useful ways across ArcGIS.
Since its debut in 2014, the ArcGIS Living Atlas team has received some common questions about how to access and understand Living Atlas.
What is Living Atlas? How can I use it? Can I nominate my own data and maps?
This blog aims to help address these core questions (and more!) so that you can get started with Living Atlas immediately. The questions are broken into three groupings: General Questions, Using Living Atlas, and Nominating Your Spatial Content to Living Atlas. Use the list of links below to navigate to the question you need, and hop back to the list using the “Back to top of blog” link at the end of each question.
General Living Atlas Questions
- What is ArcGIS Living Atlas?
- Why use Living Atlas?
- Are there any resources to help me get started with Living Atlas?
- How is Living Atlas different from the items in ArcGIS Online?
- Can I trust the content I find in Living Atlas?
Using Living Atlas
- Where can I access Living Atlas?
- How can I find what I need within Living Atlas?
- What can I do with Living Atlas content?
- What are the different badges I see on items?
- Can I access Living Atlas through my ArcGIS Enterprise Portal?
- Why do I see different content within the various Regions?
Nominating Your Spatial Content to Living Atlas
- Why nominate to Living Atlas?
- What can be nominated to Living Atlas?
- What is needed to nominate content to Living Atlas?
- How do I nominate my content?
- When nominating, what does the scoring mean?
- How does my item get curated once it is nominated?
- Will Esri edit my items in any way?
- How can I mark my items as authorititative?
- What happens after my item is accepted?
- How do I maintain my Living Atlas items?
I have more questions, or I want to learn more. Where should I go?

General Living Atlas Questions
What is ArcGIS Living Atlas?
ArcGIS Living Atlas of the World (also known as Living Atlas) connects the wider GIS community with the spatial content they need for their everyday workflows. This collection of spatial content can be accessed and used within ArcGIS, like how you would use your own local data.
ArcGIS Living Atlas of the World is an evolving digital repository assembled from the collective work of the global GIS community. It includes maps, apps, and data layers to support your work. People share their spatial content to Living Atlas to connect millions of GIS users to their spatial layers, maps, and more. Living Atlas is simply a curated view of items that are already available in ArcGIS Online. But more importantly, it ensures that the items are well-documented, authoritative, and reviewed regularly.
Why use Living Atlas?
We all need great data. Traditionally, the pattern was to find what you need, download it, process it into a usable format, and then you could finally start your work. And if you needed an updated version down the line, you would repeat this process. Luckily, web GIS makes spatial data easier to share and access than ever before. But there are millions of layers in ArcGIS Online, and it can be difficult to know if an item is trustworthy, from a good source, or will still be around again tomorrow when you need it.
Living Atlas helps you find the best content within ArcGIS Online, from both Esri and the GIS community. Your organization can both use Living Atlas as well as nominate your own content, making it significantly easier for millions of GIS users around the world to access your content.
Are there any resources to help me get started with Living Atlas?
Yes! Check out the following resources based on what you are looking for:
- Learn what’s new by following the ArcGIS Living Atlas Articles on ArcGIS Blogs
- Follow along with this short tutorial to get started using Living Atlas today
- Want to learn more? Check out this collection of tutorials to get started with Living Atlas
- Learn how to share your content to Living Atlas (this is also covered later in this blog)
How is Living Atlas different from the items in ArcGIS Online?
Living Atlas is a collection of ArcGIS Online items that have been nominated and curated. In fact, Living Atlas is simply an ArcGIS Online group storing the curated items that users like yourself have nominated. Esri doesn’t alter the items in any way. The items are still owned and managed by the data owner, they are just exposed in easy-to-find places within the ArcGIS environment to help GIS professionals do their work.
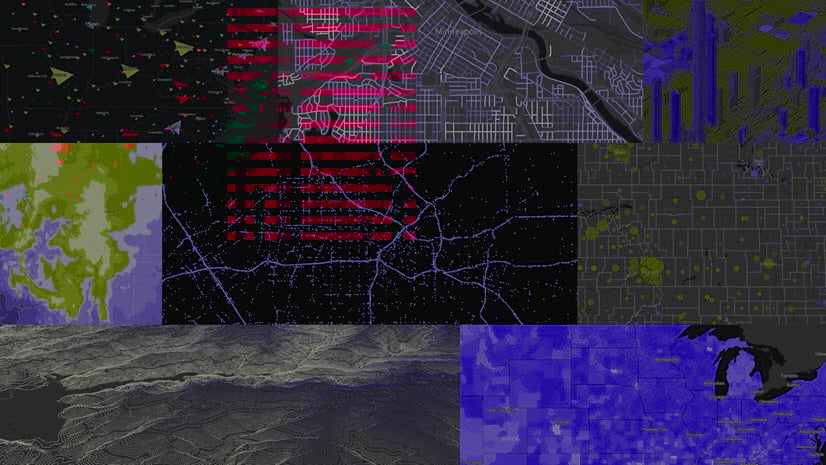
ArcGIS Online contains millions of items, many which end up with no documentation, or with titles like “TEST” or “DEMO”. Living Atlas helps you find the best of the best content within ArcGIS Online by allowing authoritative sources to nominate their existing content and make it easily accessible.
Can I trust the content I find in Living Atlas?
Items go through a curation process in order to appear within Living Atlas, and are reviewed by an Esri staff member to ensure that the content is well-documented and comes from a reliable source. In order to be accepted into Living Atlas, the curator from Esri will investigate the account who nominated the item, the source of the data, and the quality of the content. To be accepted, the item must also be well-documented, so that you can also investigate the item yourself to check if it is what you need for your work.
Using Living Atlas
Where can I access Living Atlas?
Living Atlas comes with your ArcGIS license, and can be easily accessed from the same places you normally would add data, layers, or maps into your projects. Depending on where you are working, you may see different types of items.
Living Atlas website
All item types can be found here. This is the most comprehensive view of Living Atlas content, and has a specialized search for finding what you need.

ArcGIS Online Content
All item types can also be found here. Once signed into ArcGIS Online, go to Content, and choose “Living Atlas” to browse this view.

ArcGIS Online Map Viewer
Once you are signed in, you can find Living Atlas layers within the “Add” options in the Table of Contents. Here, you’ll find layers from Living Atlas. For example, feature layers, image layers, imagery layers, etc.

ArcGIS Online Map Viewer Basemap
The default basemaps available in ArcGIS are considered Living Atlas content, but did you know you can also find additional Living Atlas basemaps and their layers in the Basemap options within Map Viewer?

ArcGIS Pro
You can find Living Atlas within the ArcGIS Online and Portal options through Add Data or through the Catalog pane.

Besides ArcGIS Online and ArcGIS Pro, you can also find Living Atlas within other apps and experiences within ArcGIS.
ArcGIS Instant Apps, ArcGIS Dashboards, ArcGIS Hub, Experience Builder, among others:

Developers
can access and use Living Atlas through the core ArcGIS Online Living Atlas group storing the most current collection. Query the group to harness the latest collection of Living Atlas content.
Note: You can also find Living Atlas content through the Living Atlas website and within ArcGIS Online when you are not signed in. This allows you to browse the content that is available, but keep in mind that advanced tools and the ability to save only appear when you are logged in.
How can I find what I need within Living Atlas?
While each product looks a little different in each place you find Living Atlas, there are a few common ways to find the content you need.
Filters
In Pro, all filtering options and categories can be found in the filter button:

Within Map Viewer, all filtering options and categories can be found in the filter button:

Categories
The major categories can help you narrow down the full collection of Living Atlas content into a more focused grouping of content for your needs.

Within each category is also a set of sub-categories to help you find more specific content:

Search
Depending on how much you know about the data you are looking for, using a search term is the best way to find what you need. Try using the source name (ex: Census, NOAA, USGS) or the high-level topic such as “soils” or “housing” or “imagery” to find related content.
Item Type
Use the filter option to find the type of content you need. Layers and web maps are the most common format to use, but there are also tools like deep learning packages, 3D web scenes, and apps. Depending on what you need, narrowing down the type will help you get to items most useful for your work.
Region
Another way to narrow down you search is to utilize the regions. If you are outside of the US in particular, there are almost 70 regions which are curated by a local Living Atlas curator for that region. This can help you find international content more easily.
Living Atlas website tips:
The Living Atlas website provides the most comprehensive view of the Living Atlas collection, and provides extra tools for finding what you need. Use the unique filtering to narrow down your search by time, Esri-only content, and items marked authoritative.

What can I do with Living Atlas content?
Depending on the type of content you are working with, and the item’s Terms of Use, what you can do varies widely.
First, go to the item page of the item you are interested in, and scroll down to check the Terms of Use:

Some items fall under a creative commons license, while items owned by Esri will fall under the Esri Mater’s License Agreement. Make sure to visit the links provided to better understand what you can do with an item. In general, you can use and distribute these types of content unless specified otherwise in the Terms of Use.
Check the item type to determine what you can do with each item:
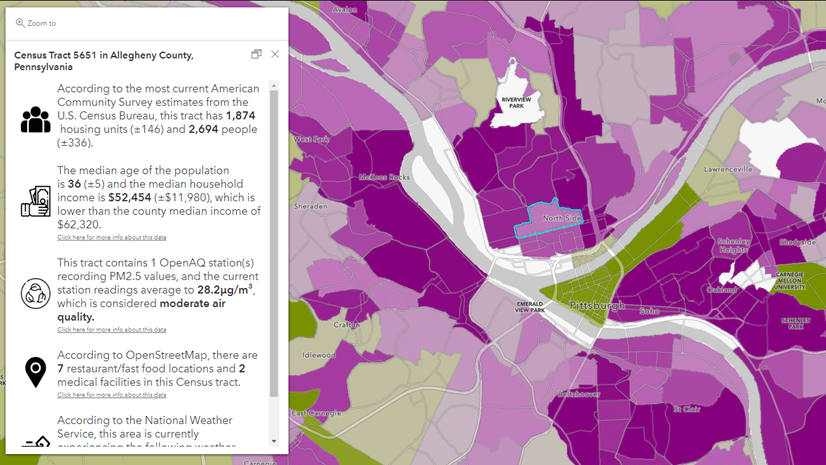
Layers come in many formats, so understanding the benefits and limitations of each type is important to understand if it can be used in your work. In general, feature layers can be used within mapping, analysis, and most general GIS workflows. You can change the symbology, pop-up, and customize to your needs. Image Service layers may generally have an extent limit, so keep this in mind when using within geoprocessing tools. Check out the full list of hosted layer types to better understand what is possible.
Web Maps can be opened, customized, and saved to your content. The benefit of using a web map is that there has been thought put into aspects like the basemap, bookmarks, symbology, and pop-up. This can help speed up your work by zooming to your area and hitting “Save”.
Apps like StoryMaps, Dashboards, and custom apps can be opened and explored to find quick answers to your spatial questions. They can also be used to inspire your own work. Some of the Highlighted Apps even allow you to download the backend code to customize for your needs if you are a developer.
Tools encompass many types of content such as deep learning packages, style files, raster function templates, and more. Explore each item to learn what can be done with that type of item and where to use it most appropriately.
To learn more about how to use Living Atlas content, check out this great blog by Bern Szukalski.
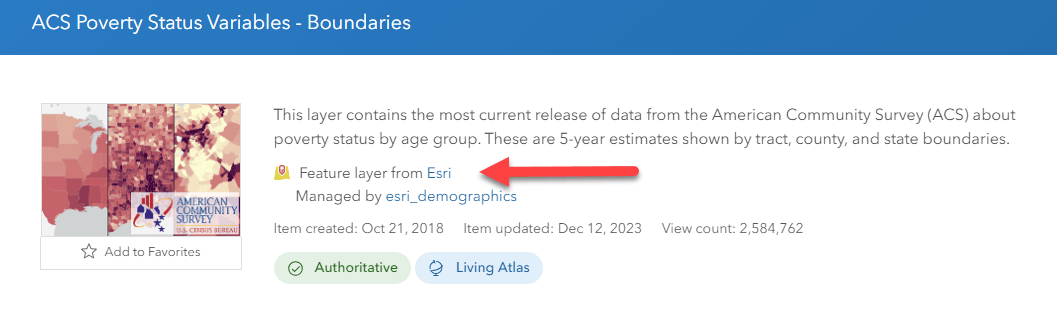
What are the different badges I see on items?
All items within Living Atlas will have a “Living Atlas” badge when you open the item description page, but some items also contain some additional badges next to the item. They may appear slightly different depending on where you are accessing the item (ArcGIS Pro, ArcGIS Online, etc). Here are some helpful hints for understanding what these mean:
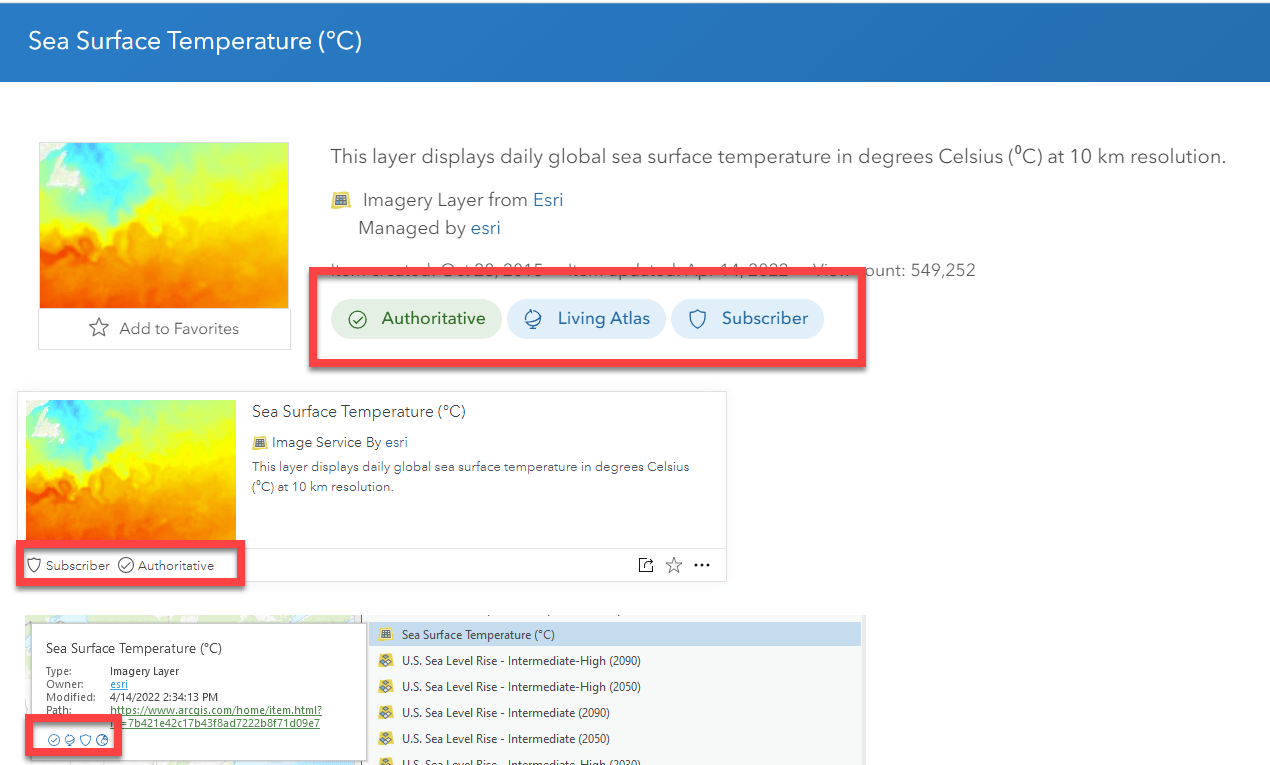
Subscriber and Premium Content
If a Subscriber or Premium content badge appears (it will look like a shield), this means that the item requires an ArcGIS Online subscription to access the item. Subscriber layers do not consume credits, but will require some extra steps if you want to share the content in your work. Premium content will consume credits to use the item. To learn more about what this means, visit the following resources:
Learn more about subscriber and premium content
Use subscriber content in your maps and apps
Authoritative Content
An organization can be designated as authoritative so that their items can appear with this badge. The organization must be verified in order to do this, and items can be marked with this badge to help end users have additional trust in the content. Because this must be done for the entire organization, this is why not all Living Atlas items have this badge. This is an opt-in step, but can greatly help the GIS community trust the items created by the organization. To learn more about authoritative content, visit the following resources:
Designate items as authoritative
Creating Authoritative Content in ArcGIS Online
Best practices for authoritative data providers
Can I access Living Atlas through my ArcGIS Enterprise Portal?
If your ArcGIS Enterprise portal has access to the internet, your organization administrator can configure it to access a subset of ArcGIS Living Atlas of the World content from ArcGIS Online. If your portal is not connected to the internet, your administrator can publish a set of ArcGIS Living Atlas of the World Esri boundary layers directly to the portal for you to use in maps, scenes, and analysis.
The content you see will depend on the version of Enterprise you are running. See what content is included in the different deployments of Living Atlas to Enterprise.
Configure ArcGIS content for your portal.
Understand the Living Atlas Enterprise update cycles.
Why do I see different content within the various Regions?
Many of the regions align with an Esri International Distributor who curates the content for that region. It is up to the local curator to determine if an item correctly fits within their specific region.
Nominating Your Spatial Content to Living Atlas
Why nominate to Living Atlas?
If you are the owner or source for reliable, authoritative GIS data, Living Atlas allows you to share that content with the wider GIS community. Living Atlas is available to GIS users within ArcGIS products, so GIS users would be able to easily find and use your content with just a few clicks.
If you already have content in Hub, that’s great! You can also contribute that content to Living Atlas. Living Atlas just exposes it in a different way, and makes it accessible to any ArcGIS user directly within products like ArcGIS Pro, ArcGIS Online, ArcGIS StoryMaps, ArcGIS Instant Apps, and more!
What can be nominated to Living Atlas?
Living Atlas doesn’t just contain data, but rather a wide variety of content types to help different GIS users within their unique GIS workflows.
- Layers – If you are the owner of an authoritative data source, you can host your data within your ArcGIS Organization. Depending on your data type, explore the various different types of hosted layer types to understand which one suits your data best. If your data lives within an Enterprise Portal, check out this resource.
- Web Maps – Once you’ve hosted your data, you can make web maps from that layer with distinct basemaps, map different attributes from your layer, use blend modes, effects, etc. These are a great way to share the stories hidden within your raw data, allowing others to save for their needs.
- Apps – Apps come in many different forms, but help you provide a customized interactive experience for your data. Tell detailed stories using StoryMaps, Instant Apps, Dashboards, custom JavaScript applications, and more. These can help a broader set of people understand and interact with your data. Find the right app for your needs here.
- Tools – Tool items allow you to share the inner-workings of your GIS workflows with ArcGIS. This includes deep learning packages, style files, rule packages for 3D scenes, and raster function templates.
- Scenes – A scene is symbolized geospatial content that allows you to visualize and analyze geographic information in an intuitive and interactive 3D environment.
- Detailed local data to be added into the basemaps – do you have authoritative local data that you’d like to contribute to enhance the collection of Esri basemaps? You can do so with a slightly different method than the items listed above. Visit Community Maps to use a specialized workflow. Provide map feedback, edit features, or send us your authoritative data that will improve the basemaps. Become a contributor to Esri Community Maps and your work will benefit many others.
What is needed to nominate content to Living Atlas?
Ultimately, the goal is to share your content to the GIS community. To share your content to Living Atlas, it must be available as an item in ArcGIS Online, and well-documented so that all GIS users have confidence using the content in their workflows. But there are also other factors that are considered to ensure your item is ready for the wider GIS community. Let’s look at a more detailed view of the standards for inclusion into Living Atlas.
You will need the following:
A public ArcGIS Organizational account, with a bio and profile configured
Share your content as an ArcGIS Online item
Item must be shared with Everyone (public)

The item details must be filled out. This is where you help the GIS Community understand what you are sharing. Your item must have:
- A descriptive title.
- A descriptive summary.
- A detailed description answering the question “what is this?” as well as “what does this item show?”. A couple of paragraphs is usually sufficient. Make sure to provide source information, web links to the source, and information about the vintage and update frequency.
- Credits defining the source of the data.
- Terms of Use defining if there are any limitations for using the item.
- Tags specifying keywords related to the topic to help users find your item easily. Enter at least 3 tags.
- A great looking thumbnail to help others understand what the item shows. Must meet the minimum 600×400 pixel default size.
Within the Settings of your item, check for a few things:
- Enable delete protection to ensure your item doesn’t accidentally get deleted.
- Make sure the item is not marked as deprecated.
A few other considerations/suggestions:
- Ensure your layers, maps, and applications utilize HTTPS. This change happened a few years ago, but some items may still be using HTTP. This also applies to any hyperlinks included within the description and Terms of Use on the item details page.
- If you are sharing a web map, narrow down the map to have less than 7 layers so that your map is clean and focused.
- Consider configuring your layer beyond the default view. Display your topic clearly beyond a blank slate to help those who are using the data. You can save default symbology, pop-up, alias names for your fields, set a visible range that makes sense for your data, add long descriptions, set filters, among other options.
For more insight to applying best practices to your shared items, visit this resource. For an example of a well-documented layer, check out this item from Living Atlas.
How do I nominate my content?
Once you have met the guidelines above, you’re ready to nominate your content! Start by going to the Living Atlas website and make sure you are signed in. Go to the Contribute tab and choose “Nominate Your Content”.

You will see all your ArcGIS Online items here, which you can search or sort to find the item you’d like to nominate. You’ll notice that each item is scored, which is checking for the completion of the components listed in the previous section of this blog. If you completed the steps above, you will see a blue “Nominate now” button, meaning you met the minimum requirements to nominate your content.
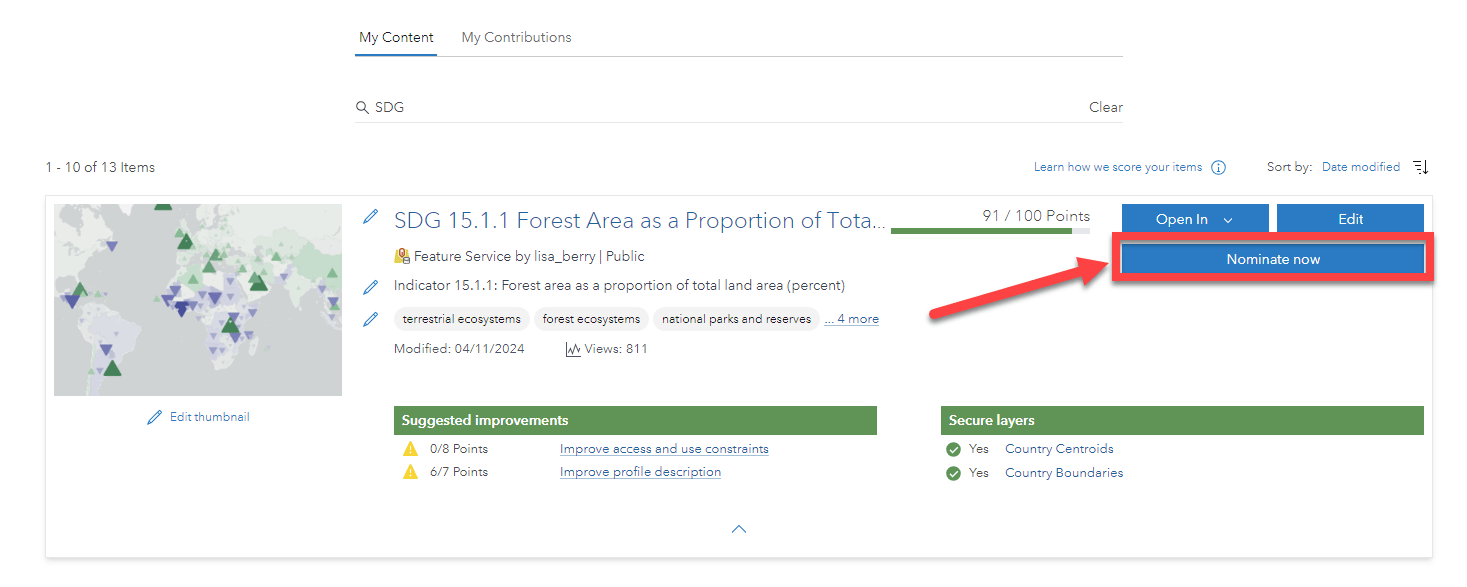
If the button is not available to click, it means you may have additional things to add to your item before you can nominate. You can see there are edit options directly within the nomination app to help you make changes easily.
For more instructions, steps, and tutorials for how to nominate, check out the following resources:
StoryMap Tutorial: Share Your Content to ArcGIS Living Atlas
A simple checklist to nominate your maps and apps into Living Atlas
“HOW TO nominate your stuff” video by John Nelson
For more details about the scoring, check out the next question in the blog.
When nominating, what does the scoring mean?
If you are nominating your item within the Contribute tab, you’ll see that each item is scored for completeness. This is based on the list mentioned previously, where more critical factors are weighted more heavily. This is not a reflection of your data, but rather a detection of how well the item’s information is filled in. For example, if I tried to nominate the item below, it would have a very low score because it doesn’t include critical items like a thumbnail, summary, etc:
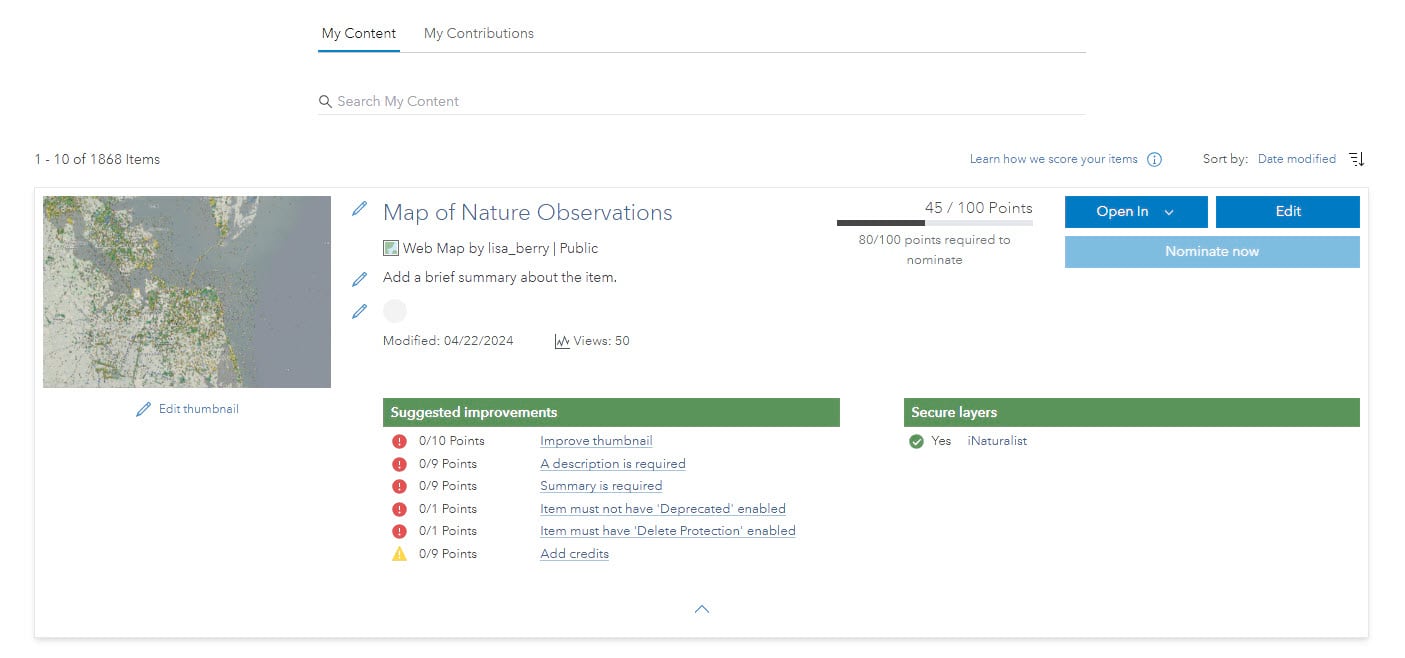
You can see there are suggested improvements listed for the item. Suggestions with a red symbol indicate this is a requirement to see the Nominate button to appear. Suggestions with a yellow symbol indicate a best practice that should be implemented to help the general GIS community better understand your item. They will also help people find the content when searching.
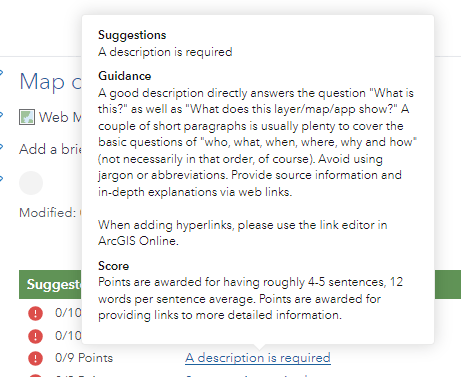
If you hover over the improvement, you’ll see some guidance on how to improve your item:
How does my item get curated once it is nominated?
Once you hit the Nominate button, a curator from the Living Atlas team will receive a notification. Within a day or two, they will review the item and make sure it meets the core requirements. If your item meets the standards, it will be accepted and shared to a group which exposes the item throughout ArcGIS.
The curator may also offer some suggestions and best practices to help improve the usability of the item for the general GIS user. There may be some additional emails and iteration back and forth until there is an agreement that the item is ready for general consumption by the GIS community.
Will Esri edit my item in any way?
No. You own and manage your own content. The Living Atlas curators will simply review your item and offer suggestions.
How can I mark my items as authoritative?
For an item to display an Authoritative badge, ensure the following requirements are met.
- The item is publicly available.
- The item is marked as Authoritative via Item Settings > General > Mark as Authoritative
- Organization is verified by Esri via Organization Settings > General > Organization Verification
For detailed steps, visit the documentation page for designating items as authoritative.
What happens after my item is accepted?
When a curator accepts your item into Living Atlas, you will receive an email and the item will appear in Living Atlas within a few minutes of that email.
Since Living Atlas is indeed a living collection of spatial content, each item is reviewed annually by the Living Atlas team of curators to ensure the item is still working properly and meets the current standards. If you don’t hear from Esri after a year, it is a good indication that your item is still in good shape. If you hear from a curator, your item may need small adjustments to remain within Living Atlas.
How do I maintain my Living Atlas items?
While the Living Atlas team reviews each item annually, you are still the owner and subject matter expert for your content. Here are some tips on how to keep your item current and relevant:
- Open your item regularly. Check that it still draws, works correctly, and there are no issues.
- Keep the data current. If the source data is updated often, check out some of the ways to keep it updated on your layer.
Explore the various ways to keep your data updated using the ArcGIS Online methods
Update your data using python feeds
Update your data from a feature class in Pro
- Keep your item page up-to-date so that anyone using the content has the most current information.
- Update your web maps if the data layer behind the scene updates. You may need to update symbology or pop-up depending on how your data changes over time.
- If you need to remove an item from Living Atlas, there are various ways to do this. You can make the item private, or you can mark it as deprecated.
I have more questions, or I want to learn more. Where should I go?
If your question was not covered in the questions in this blog, or if you want to learn more about how to use and access Living Atlas, there are a few ways to connect with the Living Atlas community. Join the conversation at the Living Atlas Esri Community page and follow us on X.


Article Discussion: